In the first phase of this epic journey, I teamed up with 39 other engineers-in-the-making, split into six groups:
Together, our mission was to figure out the big-picture stuff: where in the world to put this offshore energy island, what cutting-edge renewable energy technologies we could cram onto it, how much it would cost, and most importantly, how to get six groups of engineers to talk to each other without frying the circuits...
Then came phase two—the “now it gets real” part. Each group laser-focused on their own area of expertise. As part of MEng Mechanical Group, my team and I took on the challenge of designing the island’s wind turbines, which would provide the bulk of its renewable energy. In other words, we were tasked with making giant, high-tech fans that could handle extreme winds and look good doing it.
Our team produced the mighty MEng Mechanical Final Report, featuring:
After all that, each group’s work came together like pieces of a puzzle in the Team 3 Final Report, which showed how all our ideas—from solar panels to wave converters to wind turbines—would work in harmony to create a fully operational offshore energy island.
Spoiler: it’s pretty awesome.
And now, buckle up for a whirlwind tour of our designs—because who knew wind turbines could have this much personality?
Here's our team hierarchy!
Just like your favourite superhero team-up, but with more spreadsheets and fewer capes!




Our grand plan: Boost Crete's renewable energy by 15%, using a floating island with wind, wave, and solar energy


Crete: a hotspot for tourists and trade, but now also the perfect stage for harnessing wind and solar energy as the island ramps up its renewable efforts from 20% to a green-powered 35%!
These following slides break down how we're building the ultimate sustainable energy island.
First, we picked the perfect spot with awesome wind, sun, and waves, all while keeping Crete’s fish happy (Location & Environment).
Then, we made sure the island runs like a well-oiled machine, cranking out 720 GWh a year and holding strong in a storm (Functionality & Operability).
The design? It’s sleek, low-maintenance, and ready to grow with future needs (Design).
Plus, we're planning ahead—recyclable materials, 20-year lifespan (Life Cycle).
All this while ticking off key Sustainable Development Goals and making sure our island plays nice with nature.
Teamwork makes the dream work! Each group handed over their pieces of the puzzle, from turbine heights to energy outputs, making sure our island breezes past challenges like wind variability and marine life impact.
From sleek horizontal giants to compact vertical turbines, each design has its strengths—whether it's power, stability, or low maintenance—but all come with their own set of challenges, like figuring out the best way to balance efficiency, logistics, and environmental impact.
Concept Design I:
Classic horizontal turbines: big, powerful, and offshore for less noise, they’re energy champs, though they come with a side of hefty installation costs and logistical headaches.
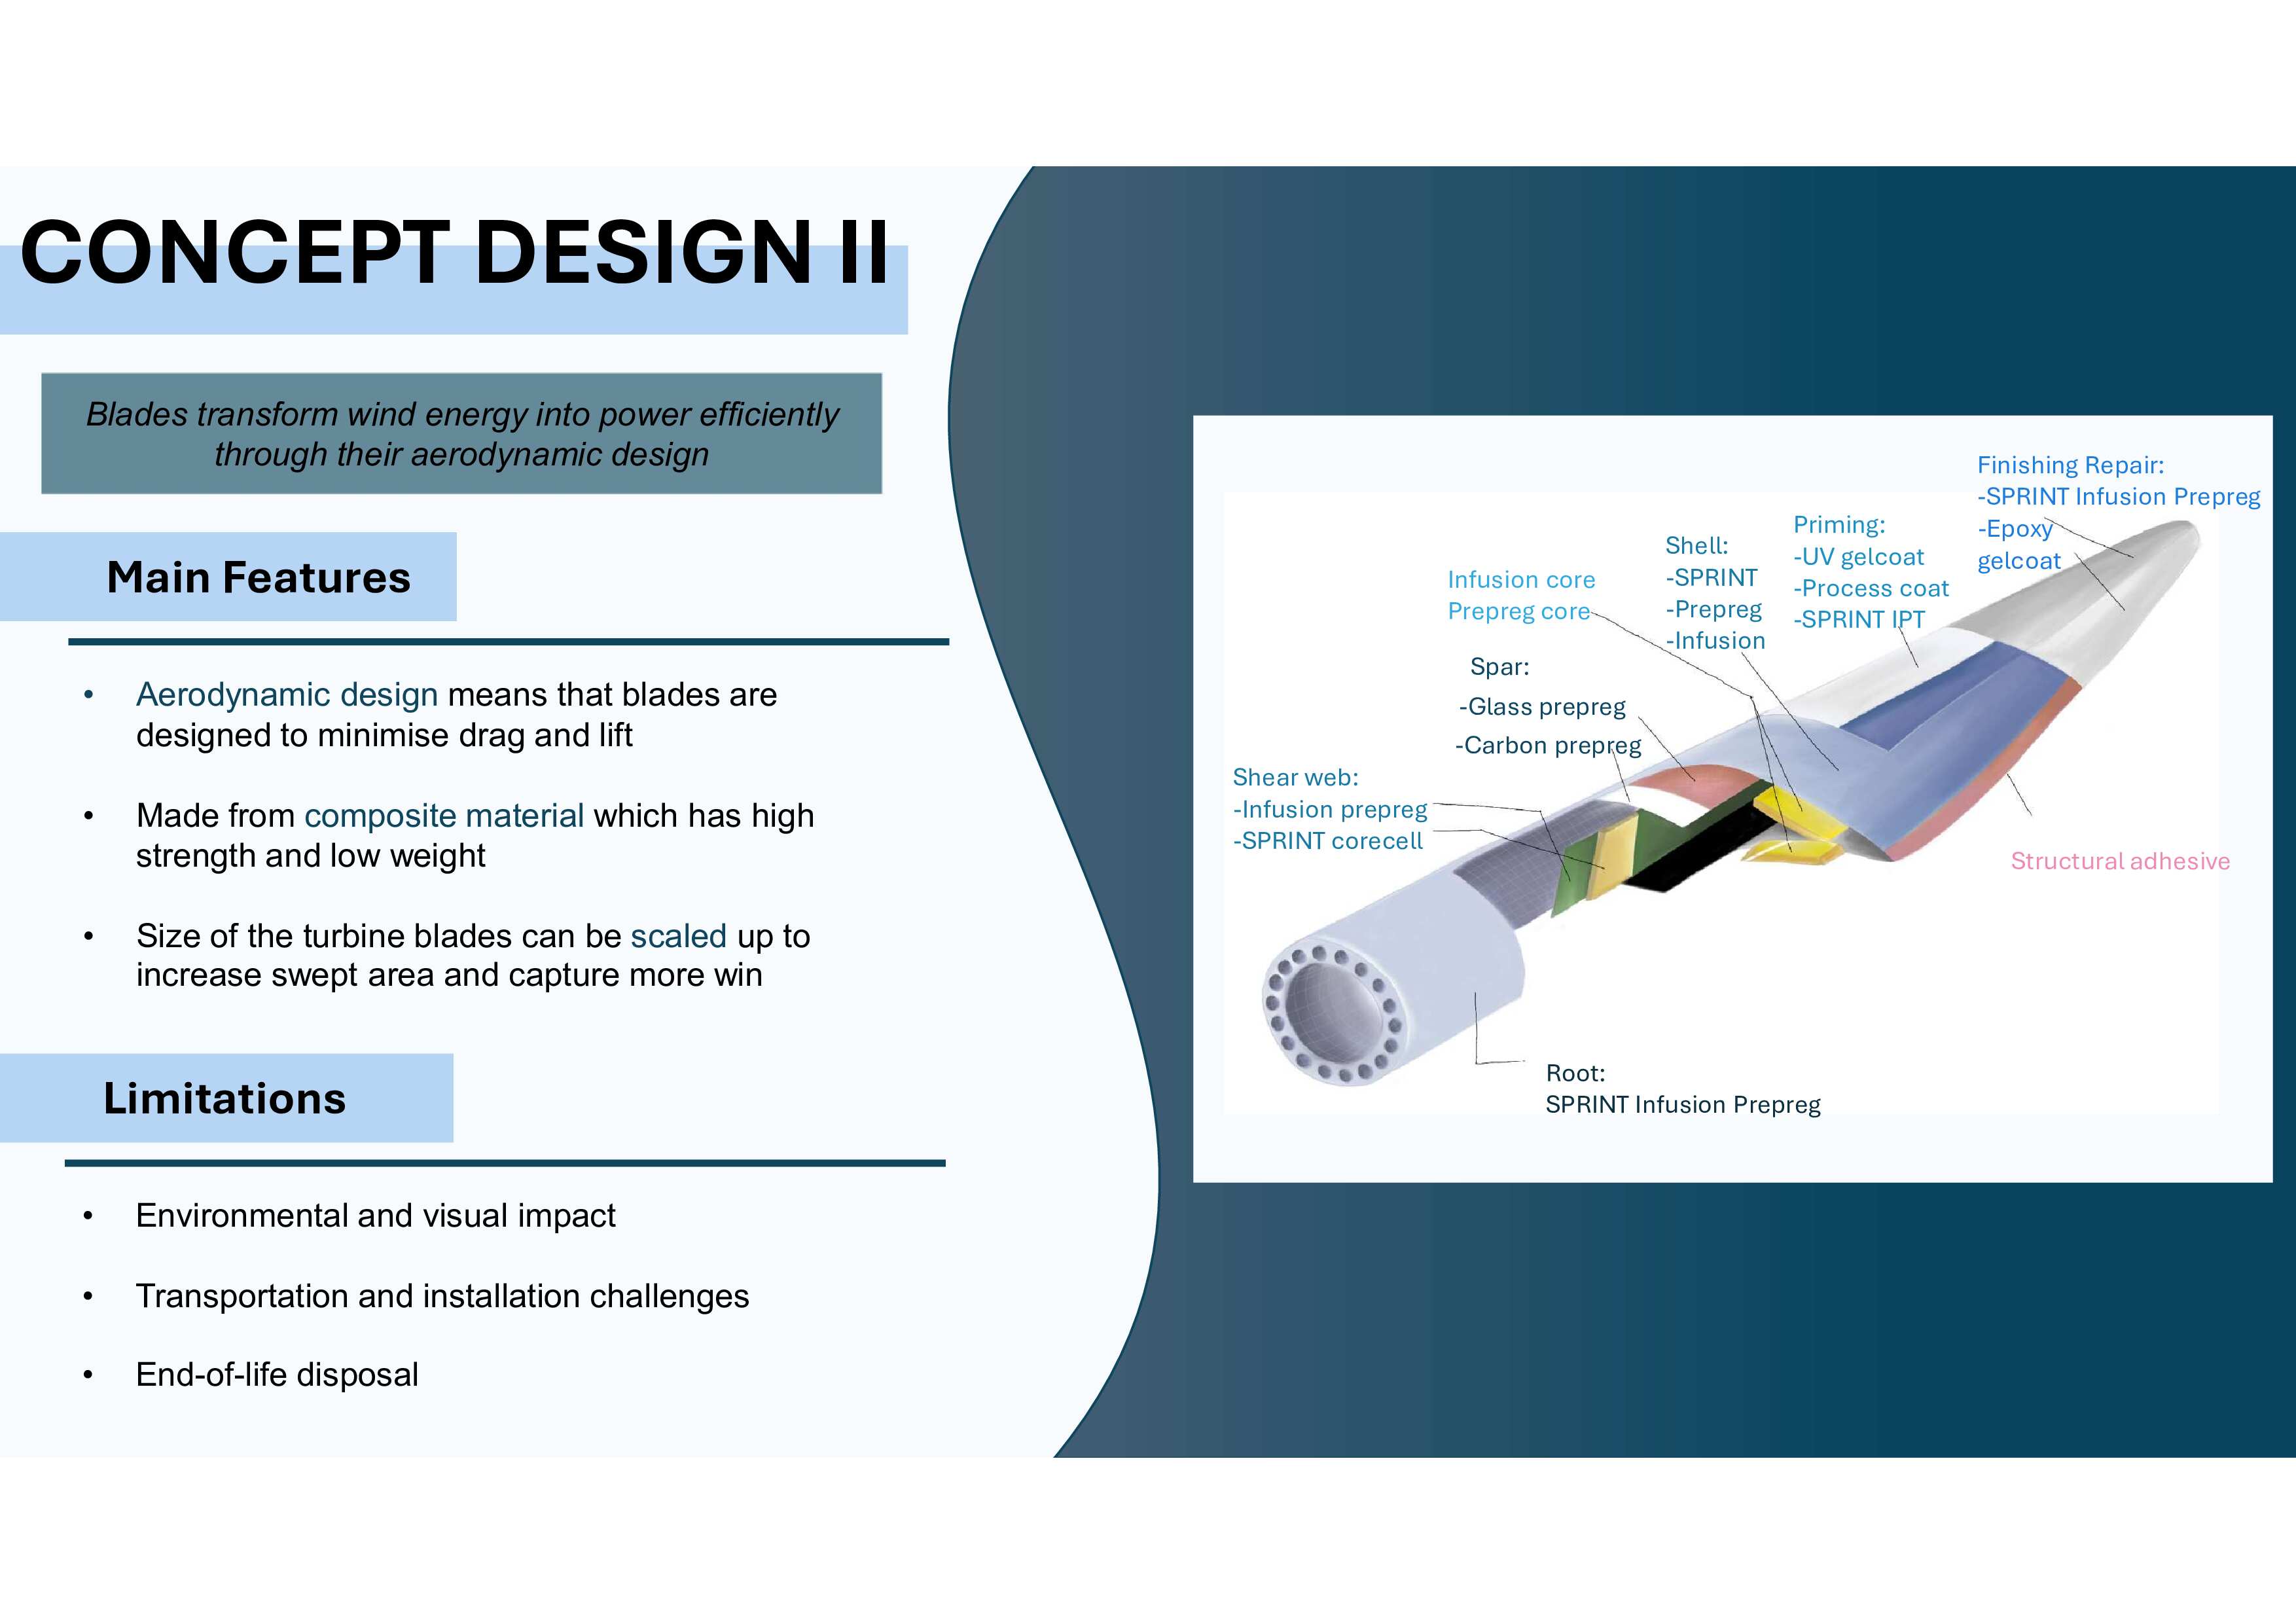
Concept Design II:
Aerodynamic and strong, these composite blades cut through the wind like pros, but they’re a bit high-maintenance when it comes to transportation, installation, and keeping things eco-friendly.
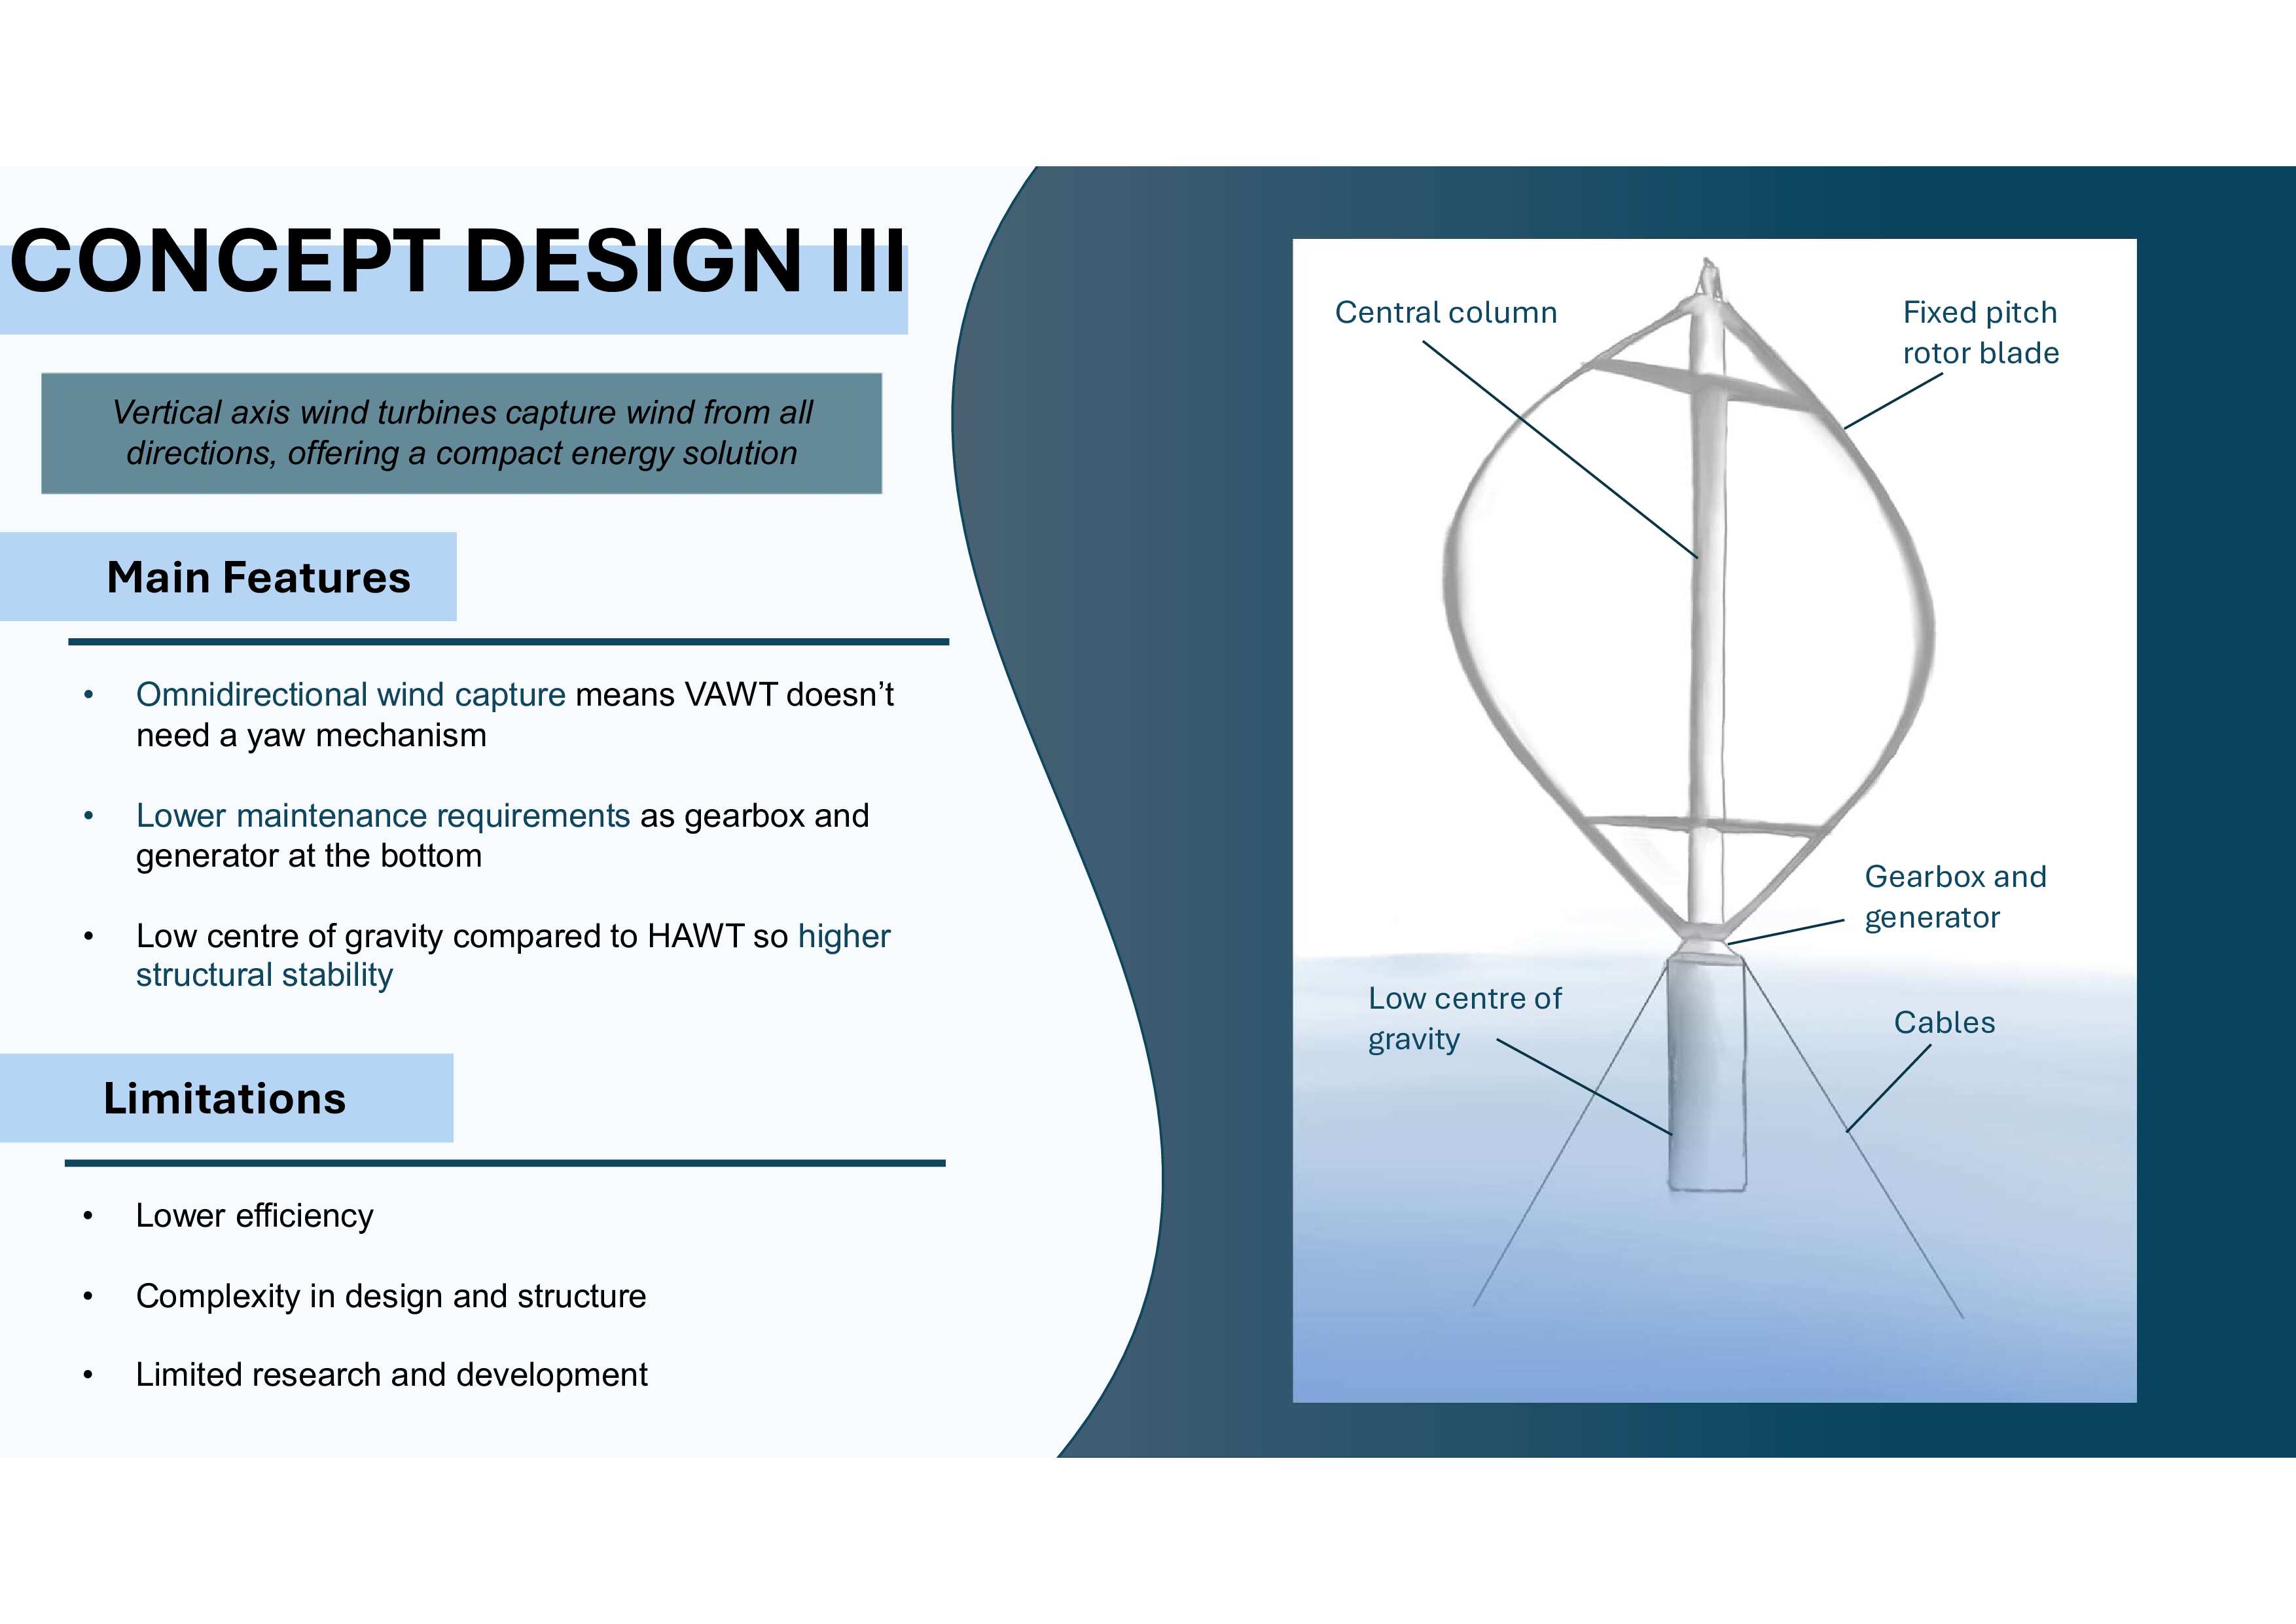
Concept Design III:
Vertical axis turbines: catching wind from all directions, needing less maintenance, and standing tall with a low center of gravity—but still figuring out how to be as efficient as their horizontal cousins.
Now that we've dazzled you with our teamwork on the presentation, let’s get into the nitty-gritty with the group report—where all those big ideas actually start to make sense!
Lorem ipsum dolor sit amet, consectetur adipiscing elit. Suspendisse varius enim in eros elementum tristique. Duis cursus, mi quis viverra ornare, eros dolor interdum nulla, ut commodo diam libero vitae erat. Aenean faucibus nibh et justo cursus id rutrum lorem imperdiet. Nunc ut sem vitae risus tristique posuere.
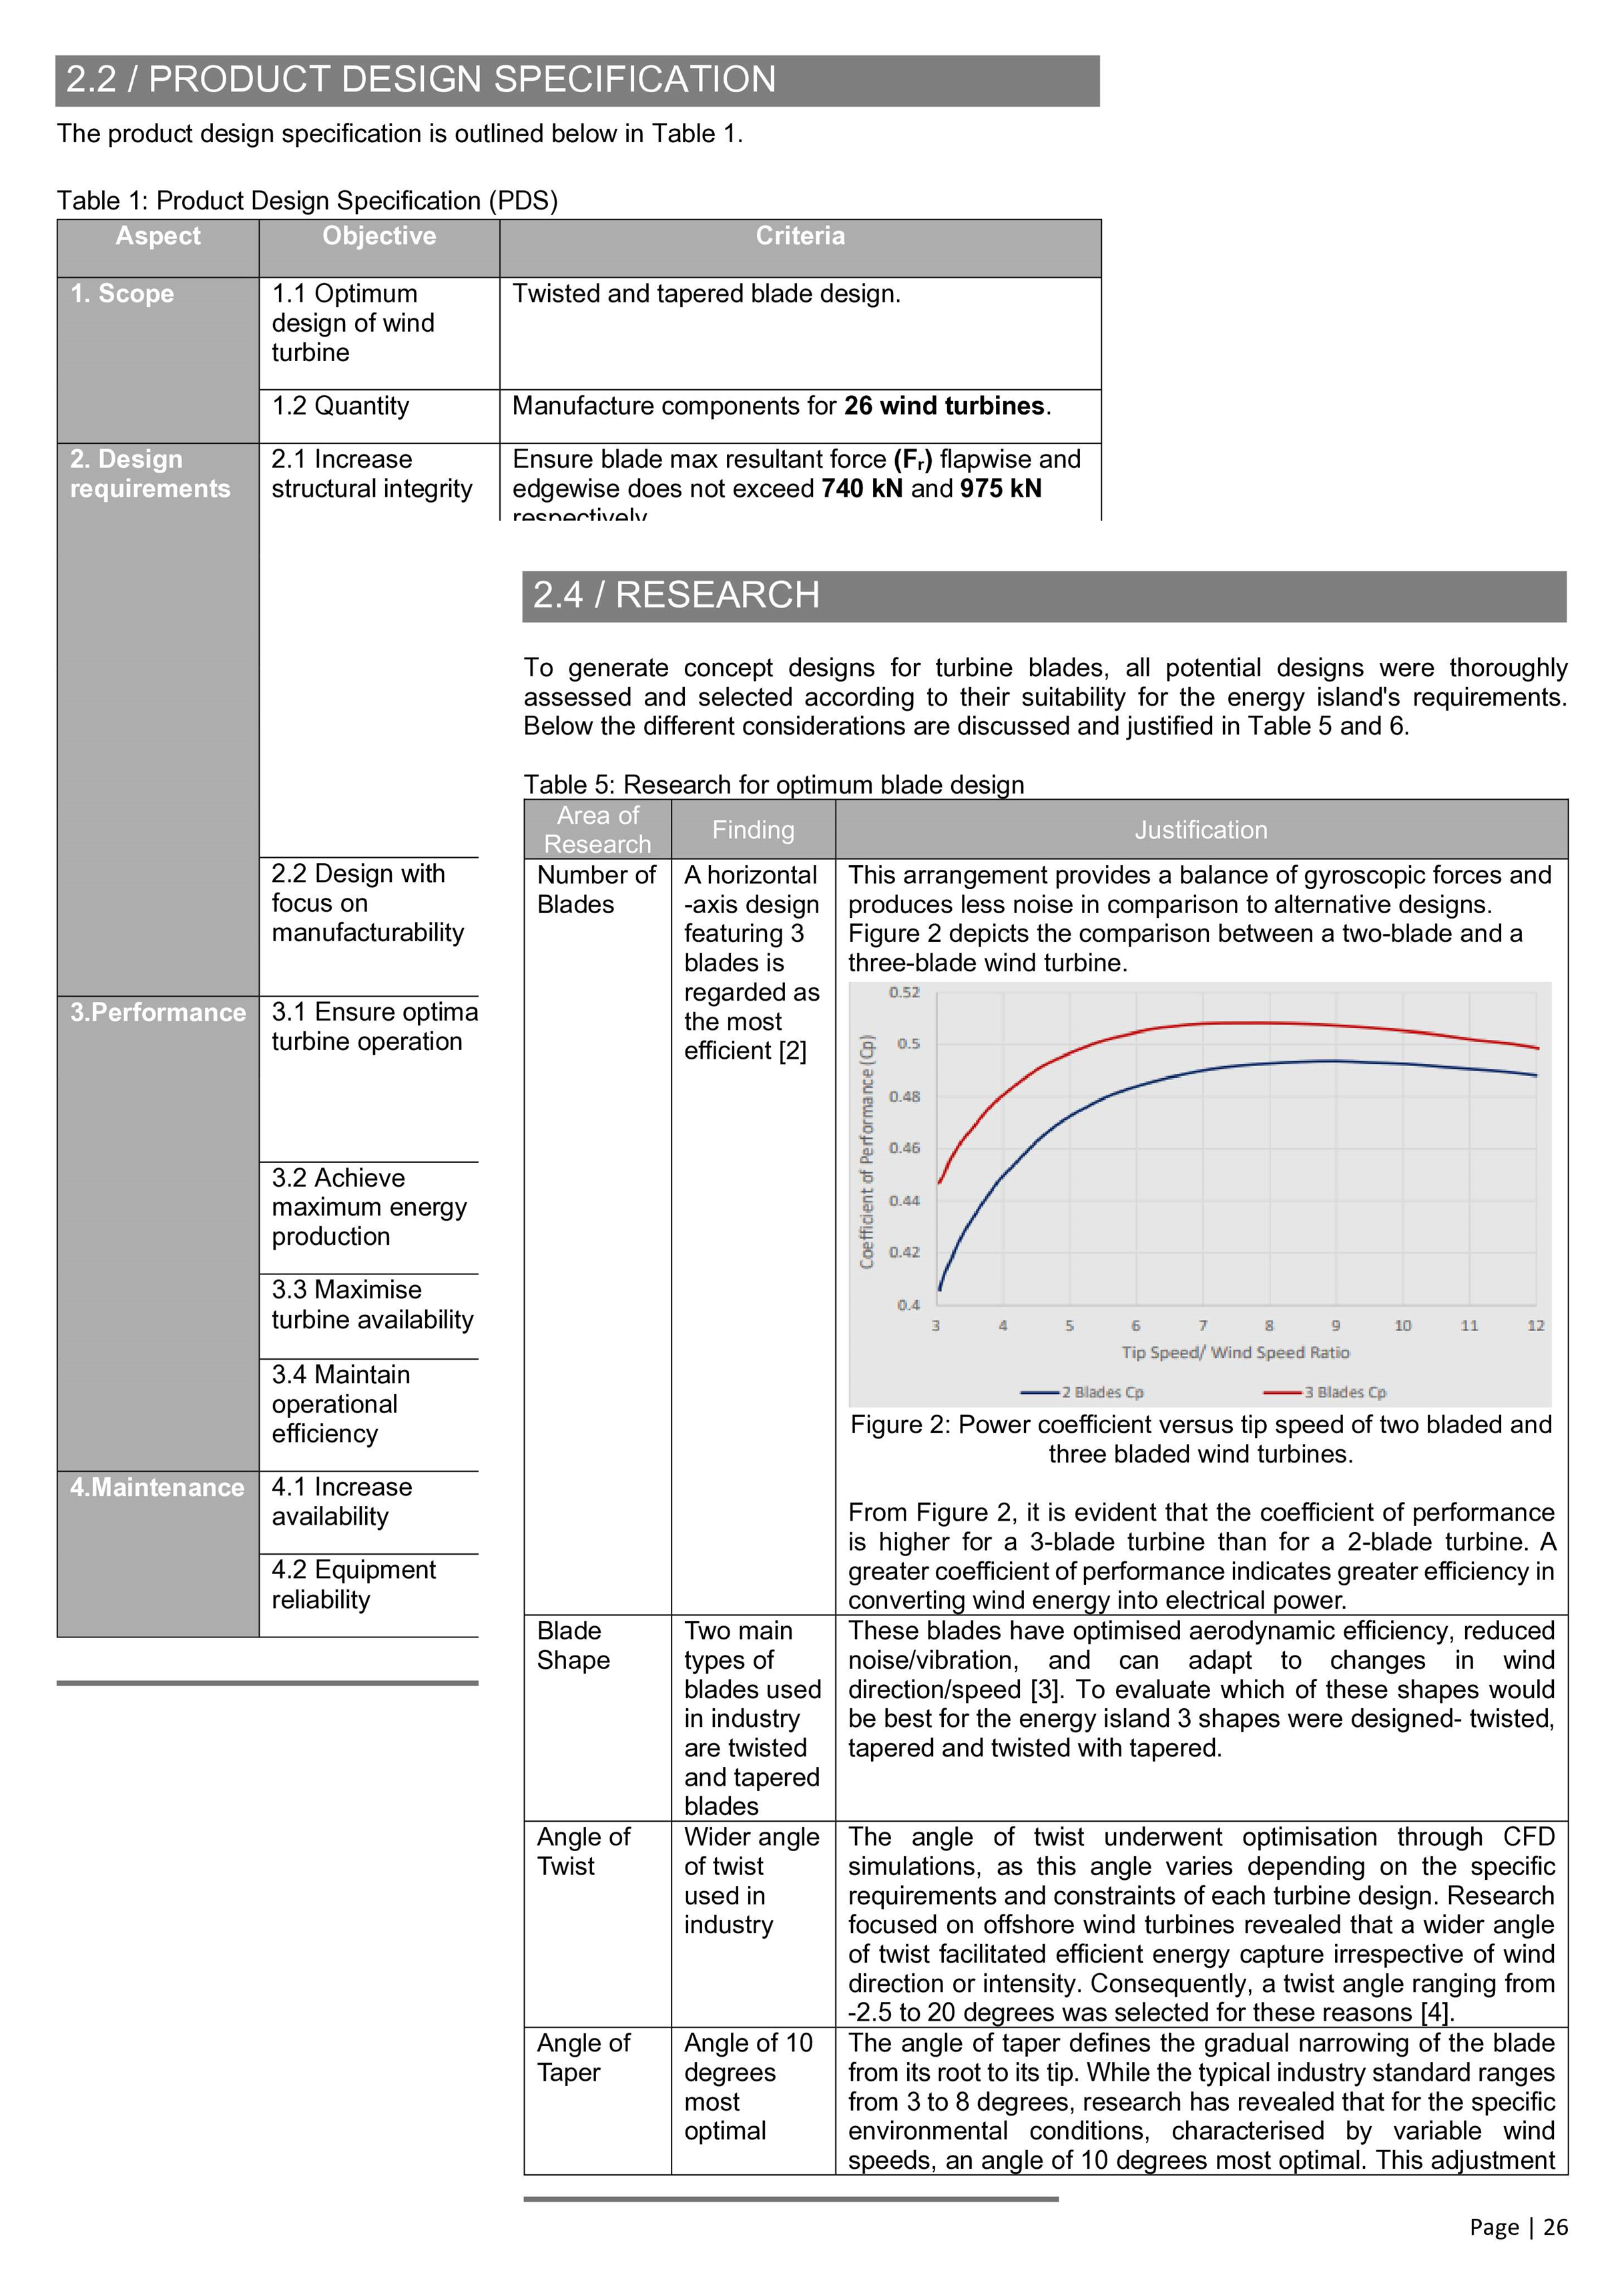
Our Product Design Specification (PDS) was basically the project’s ‘to-do’ list. We needed to design a wind turbine that’s efficient, tough, and won’t break the bank. The blades? Twisted and tapered for ultimate performance—kind of like a fancy croissant, but with less butter. And since these turbines will live offshore, we made sure they could handle all the salt, wind, and drama that comes with it!"
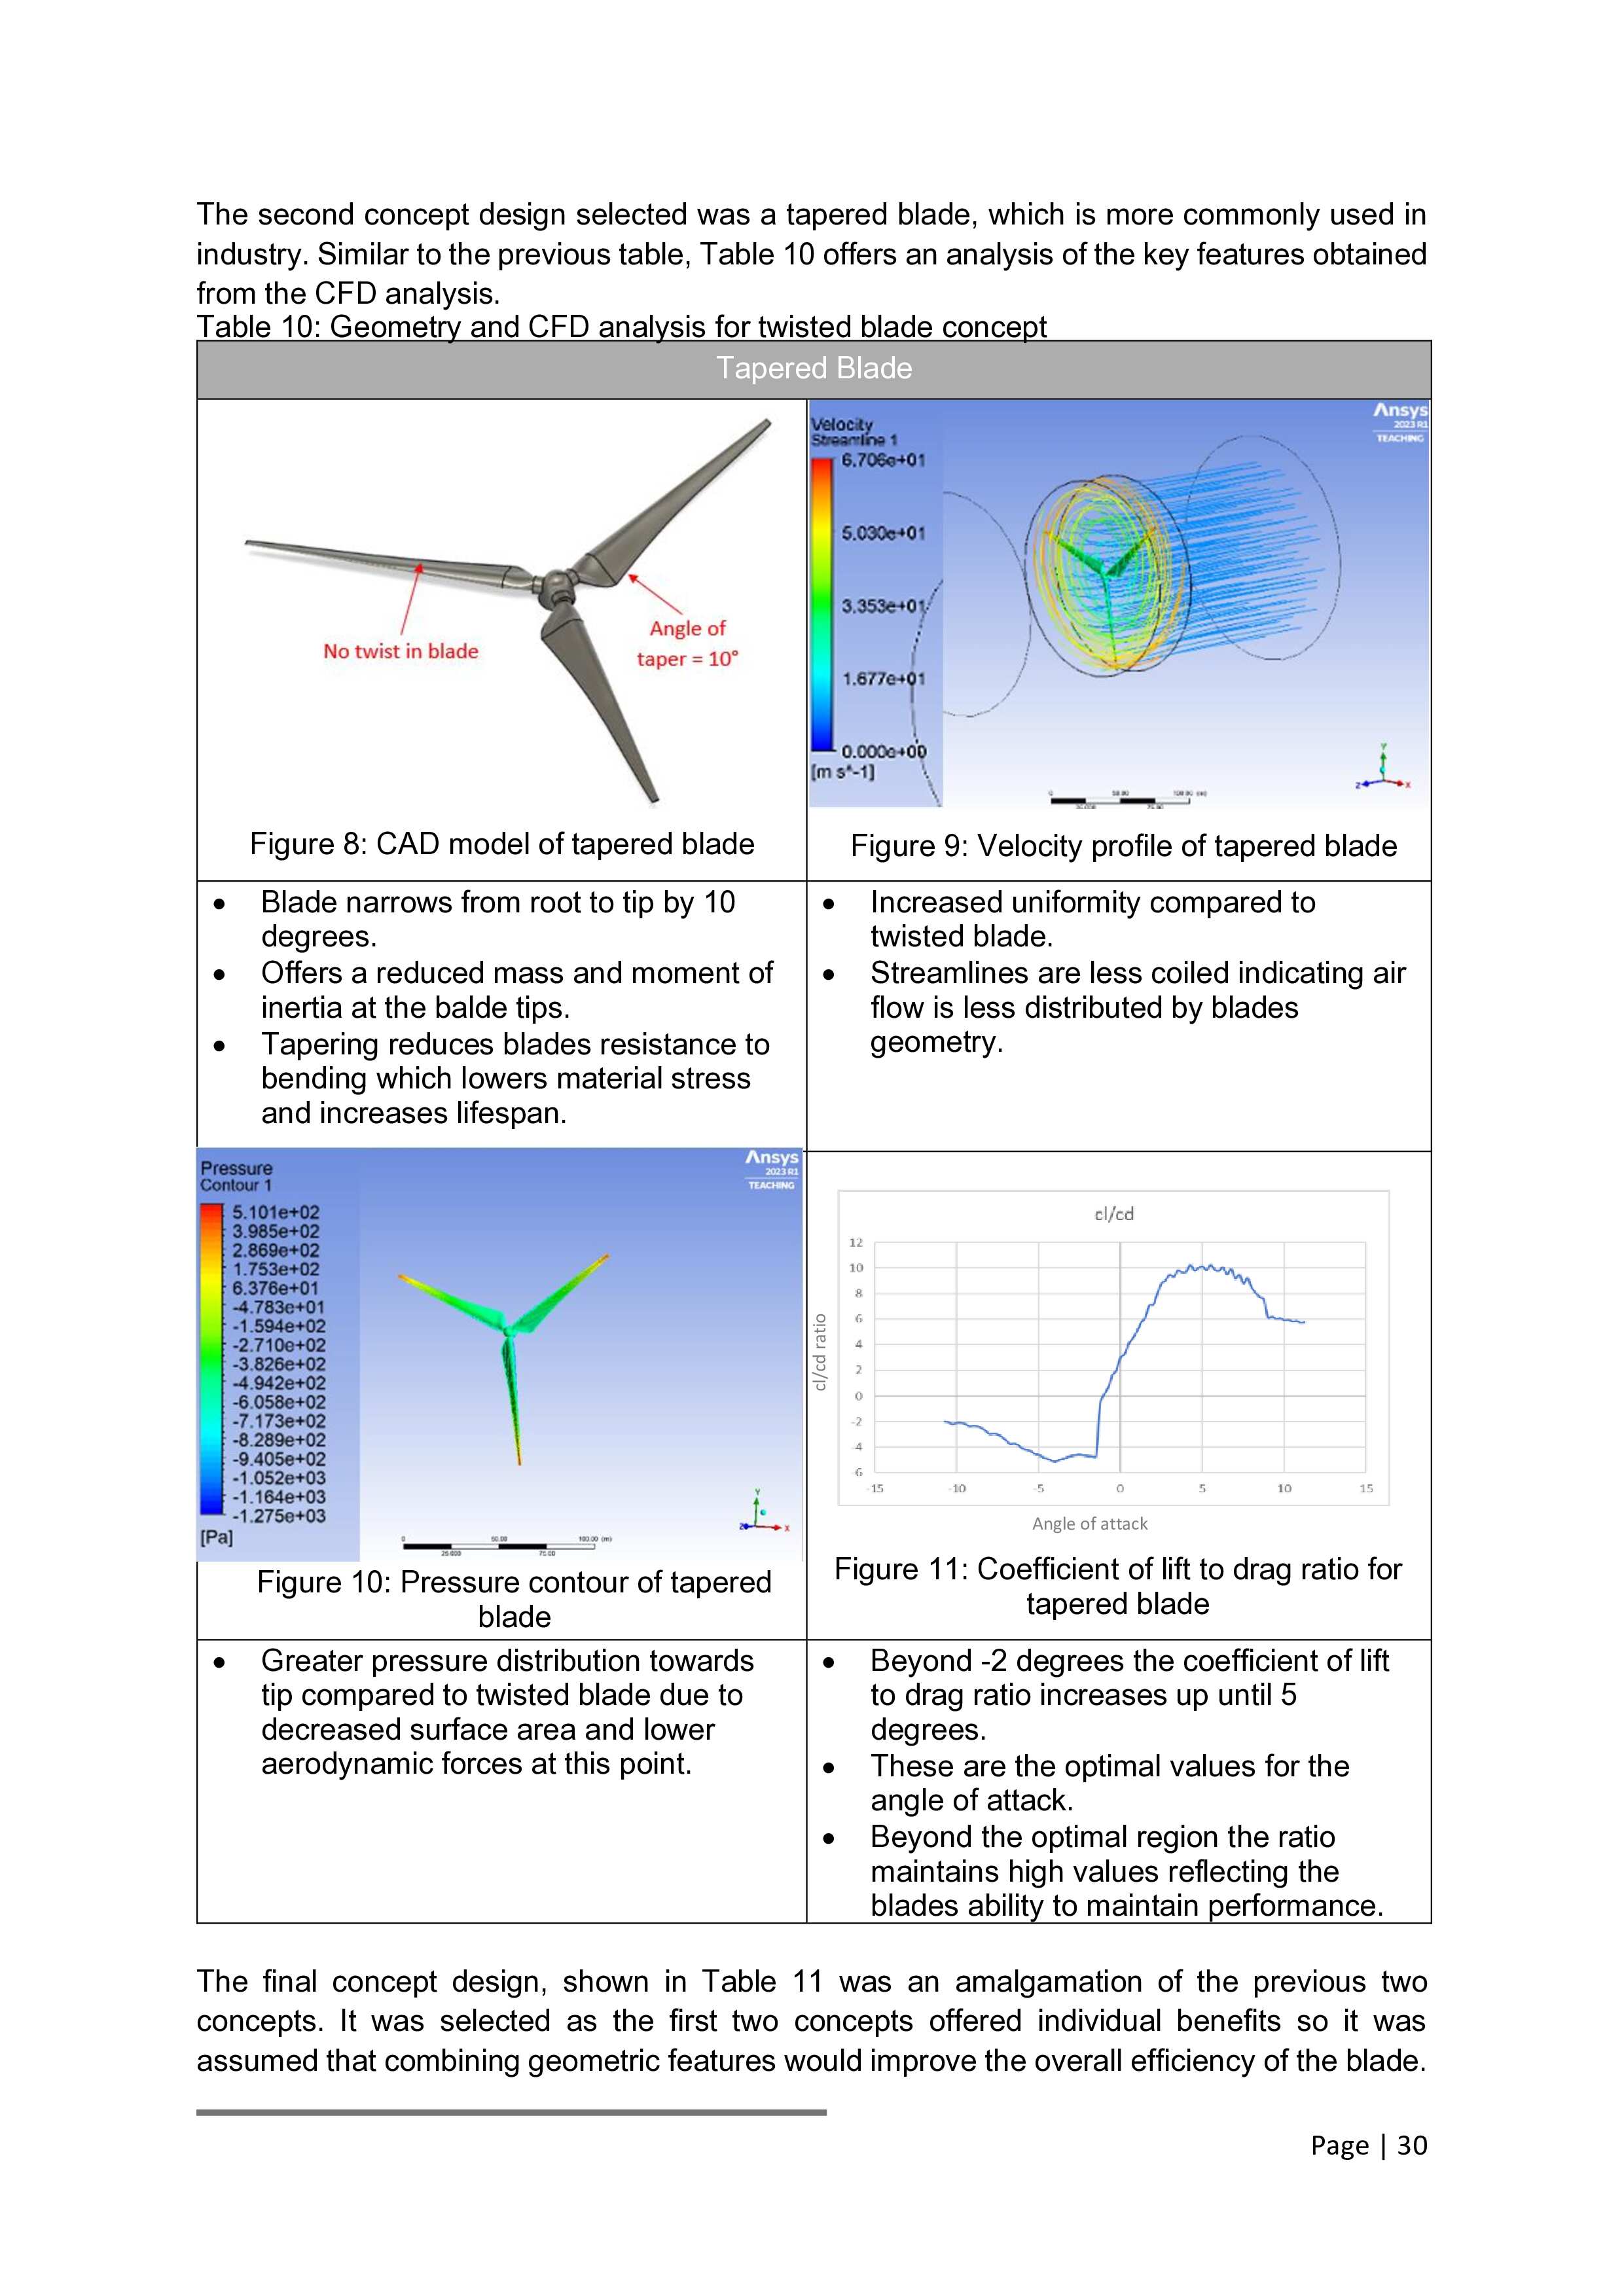
We then dove deep into wind turbine research—turns out, not all blades are created equal! We compared different shapes, like twisted and tapered blades, using CFD and FEA simulations (which are as complicated as they sound) to see which would catch the most wind and last the longest. We also geeked out over airfoils, making sure these blades could handle all kinds of wind conditions while staying as efficient as possible. Think of it as designing the ultimate frisbee—if that frisbee was powering an entire island!"
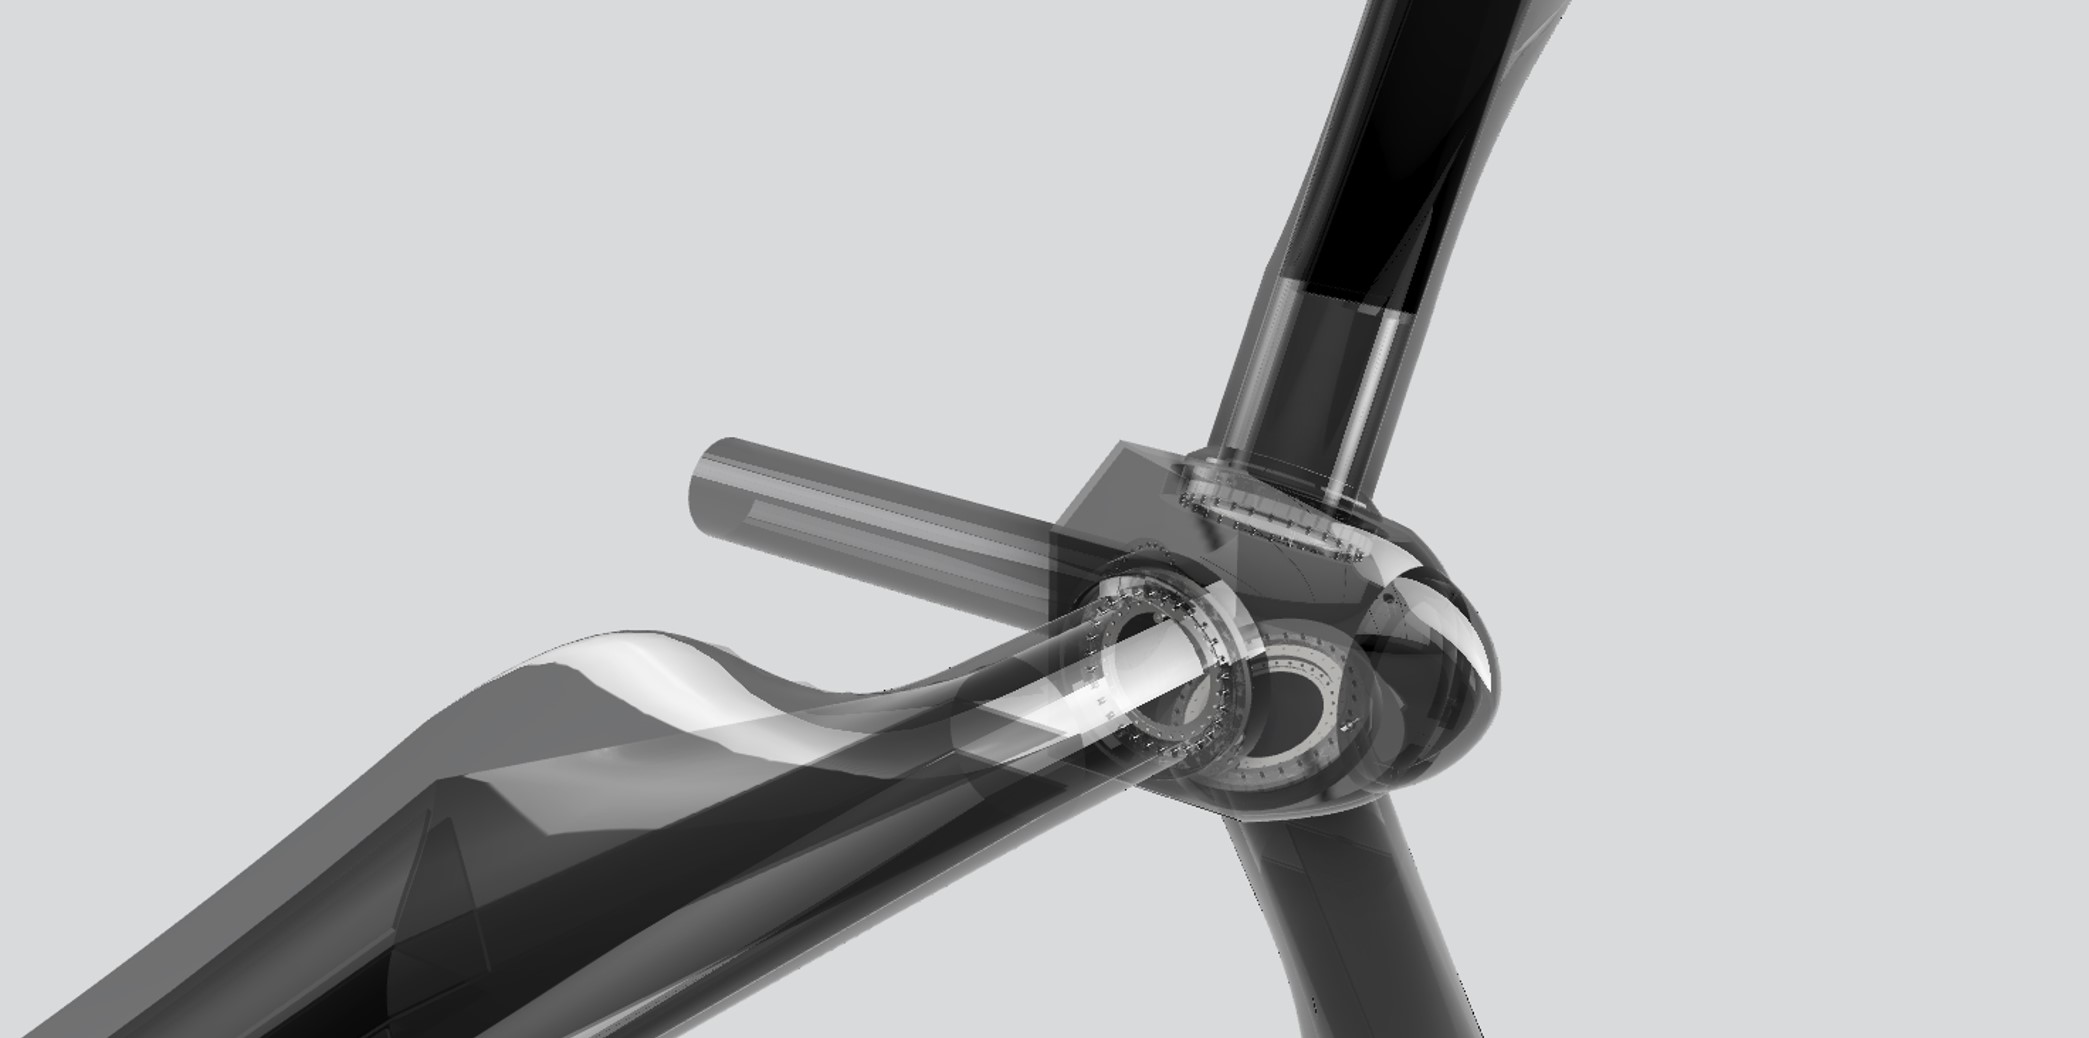
We used FEA (Finite Element Analysis) and CFD (Computational Fluid Dynamics) to put our blade designs through a test. We ran simulations to see how they’d hold up against wind, pressure, and every force Mother Nature could throw at them. We calculated everything—lift, drag, bending moments, even how much they’d twist and bend under stress. It’s like sending our blades to an extreme wind tunnel boot camp. And the best part? They passed with flying colors. Our results showed the blades are not only tough and durable but also incredibly efficient at capturing wind and converting it into energy.
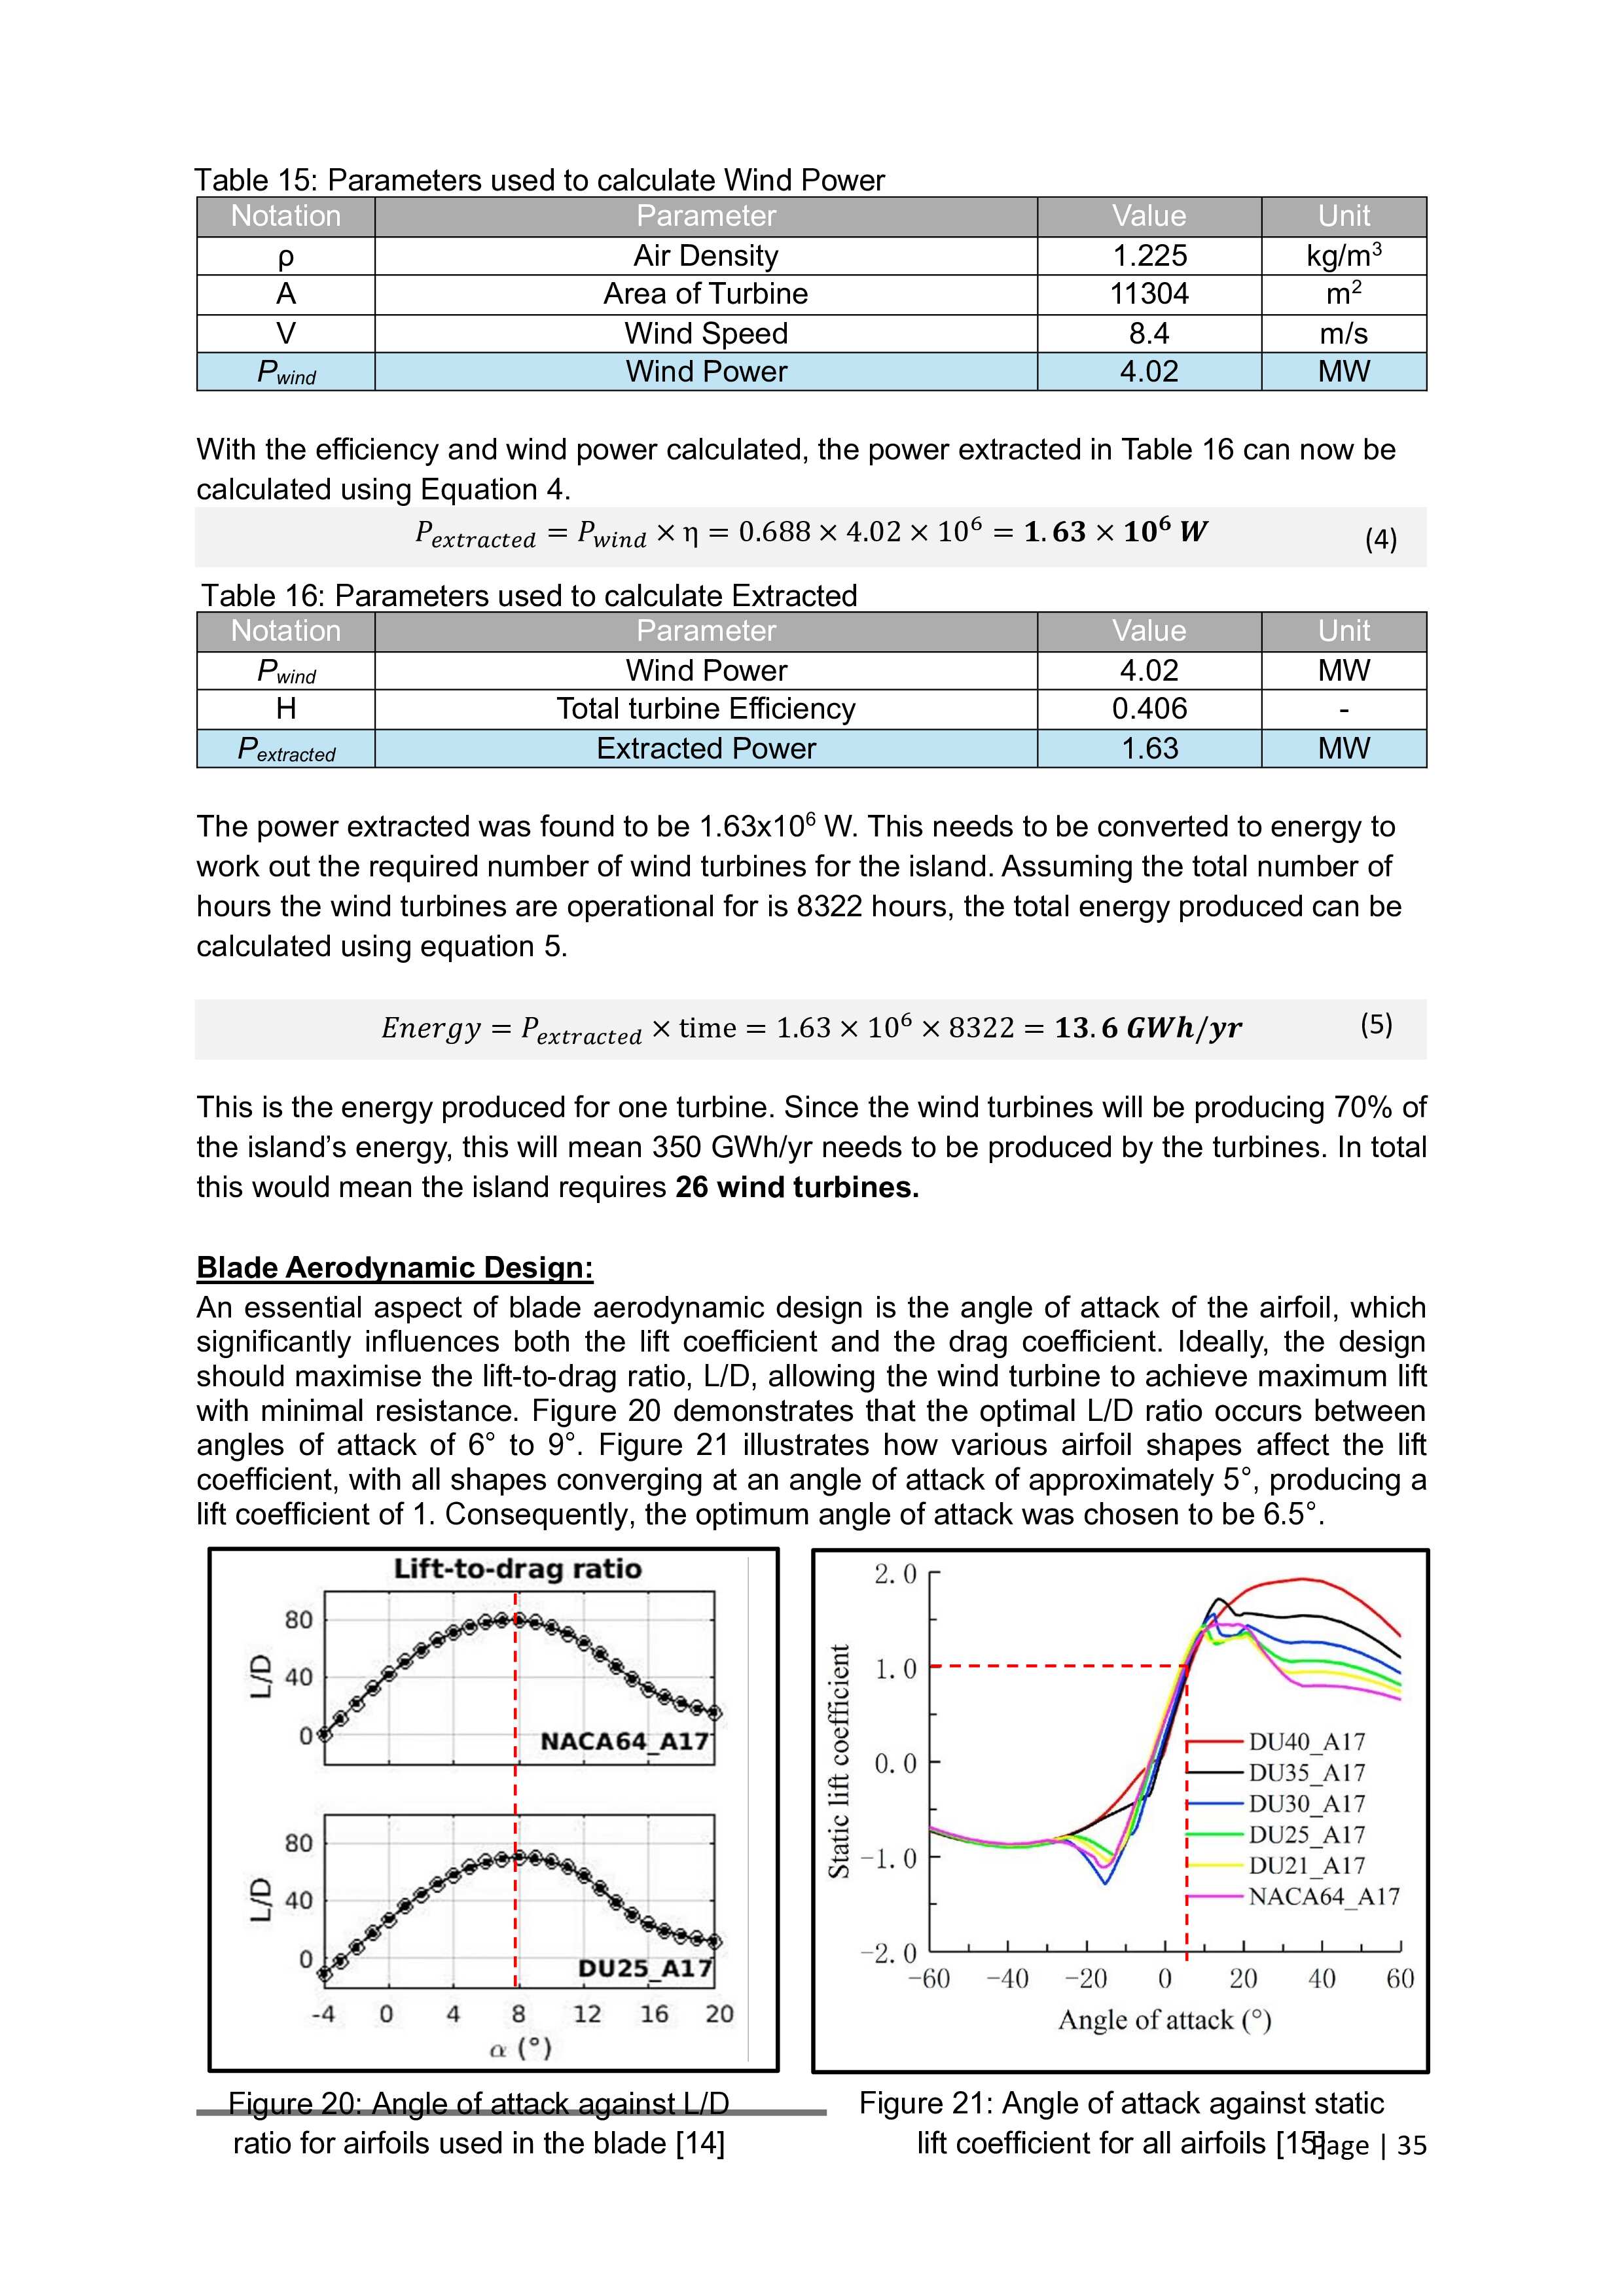
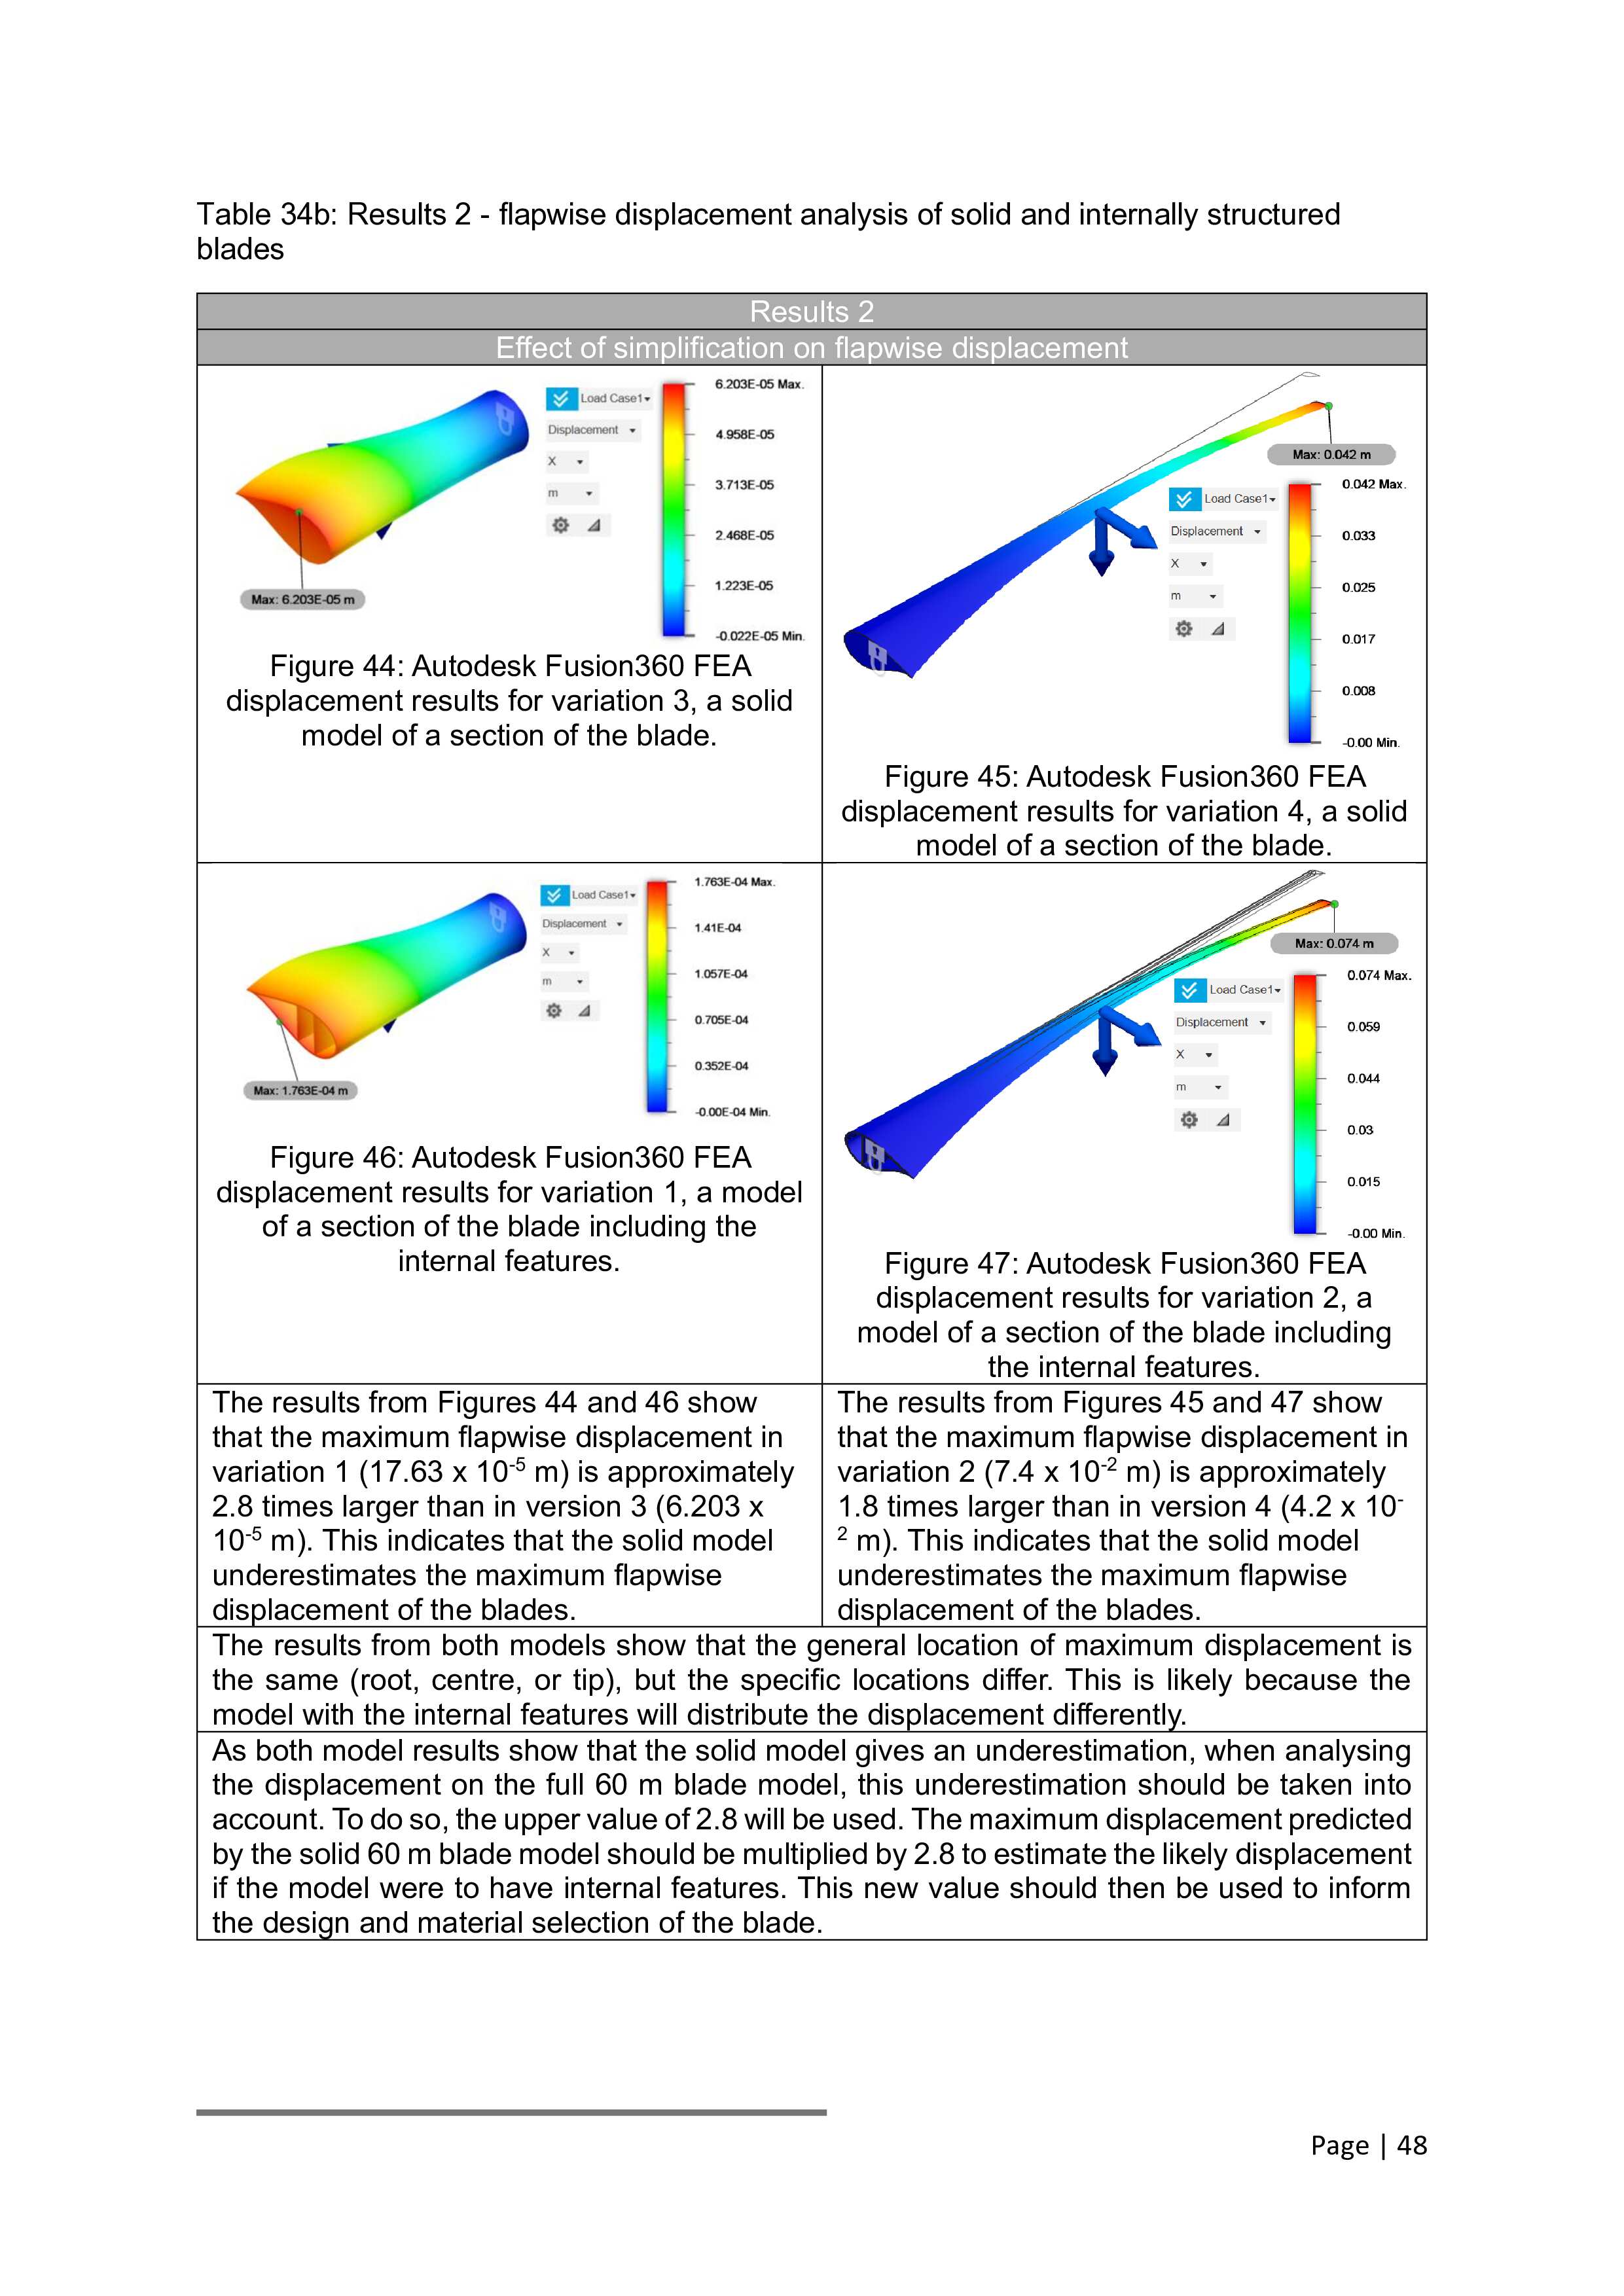
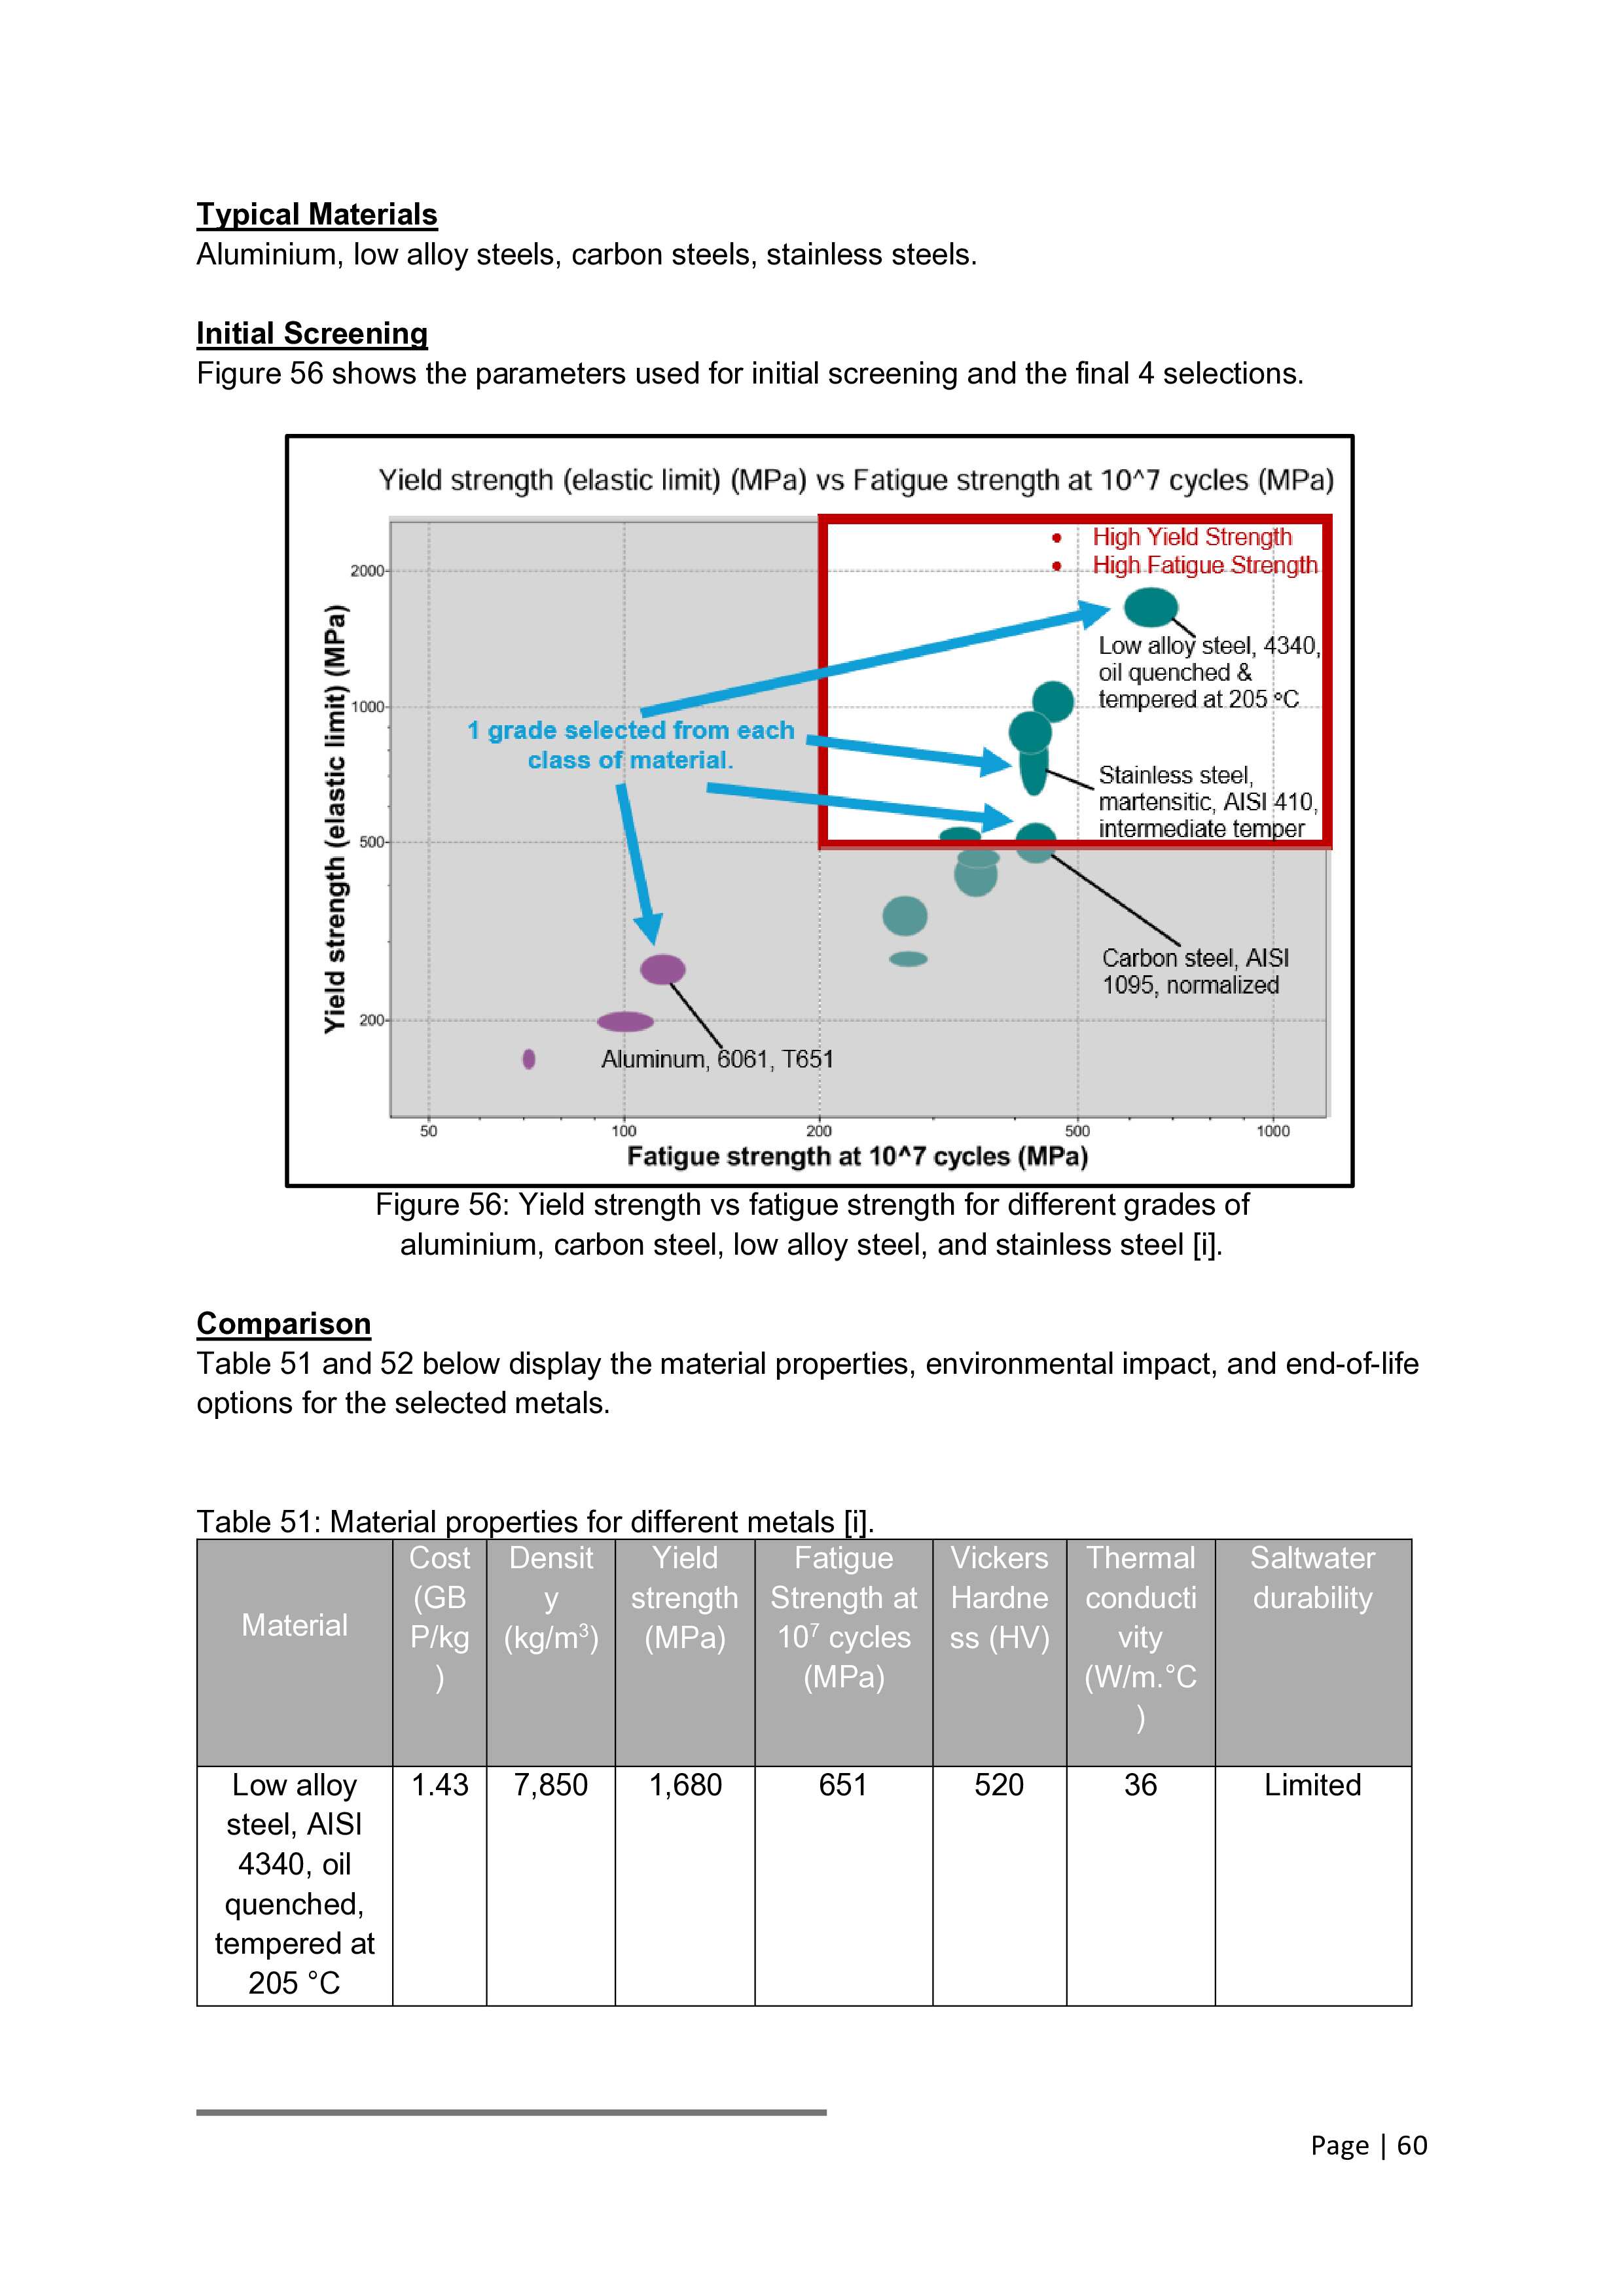
When it came to picking materials, we weren’t just choosing any old stuff—we needed something that could handle the harsh offshore environment without turning into a rusted mess. So, we went with corrosion-resistant, lightweight materials like GFRP (Glass Fiber Reinforced Polymer) for the blades. It’s tough, durable and won’t flinch in the face of salty sea air. Plus, it’s designed to take a beating from wind and weather while staying light enough to keep the turbines spinning efficiently. We also considered sustainability, selecting materials that minimise environmental impact and, where possible, using recycled content.
The final design is where everything came together. After countless simulations, calculations and stress tests, we landed on a turbine blade that’s optimised for both performance and durability. The blades have a twisted and tapered shape to maximise wind capture while minimising wear and tear. We also incorporated lightweight, corrosion-resistant materials to handle the tough offshore conditions. On top of that, the design focuses on easy manufacturing and maintenance, so it’s efficient to build and can last for decades with minimal downtime. In short, this final design isn’t just about power—it’s about creating a turbine that’s built to perform, last and keep spinning in all conditions.
Once this phase was completed, it was time to focus on the business case—turning this innovative, durable turbine into a cost-effective and scalable solution that not only meets energy demands but also stays within budget and operational timelines.

Our business case was all about balancing cutting-edge design with financial feasibility. We aimed to deliver high-performance wind turbines while keeping manufacturing and operational costs low. The focus was on scalability—producing components efficiently for multiple turbines—and minimizing maintenance costs over the long term. By using cost-effective materials and streamlining production processes, we ensured that the project could meet energy demands and sustainability goals without breaking the bank. Additionally, we developed a clear timeline for production and installation, ensuring that the project remains on schedule and within budget.".
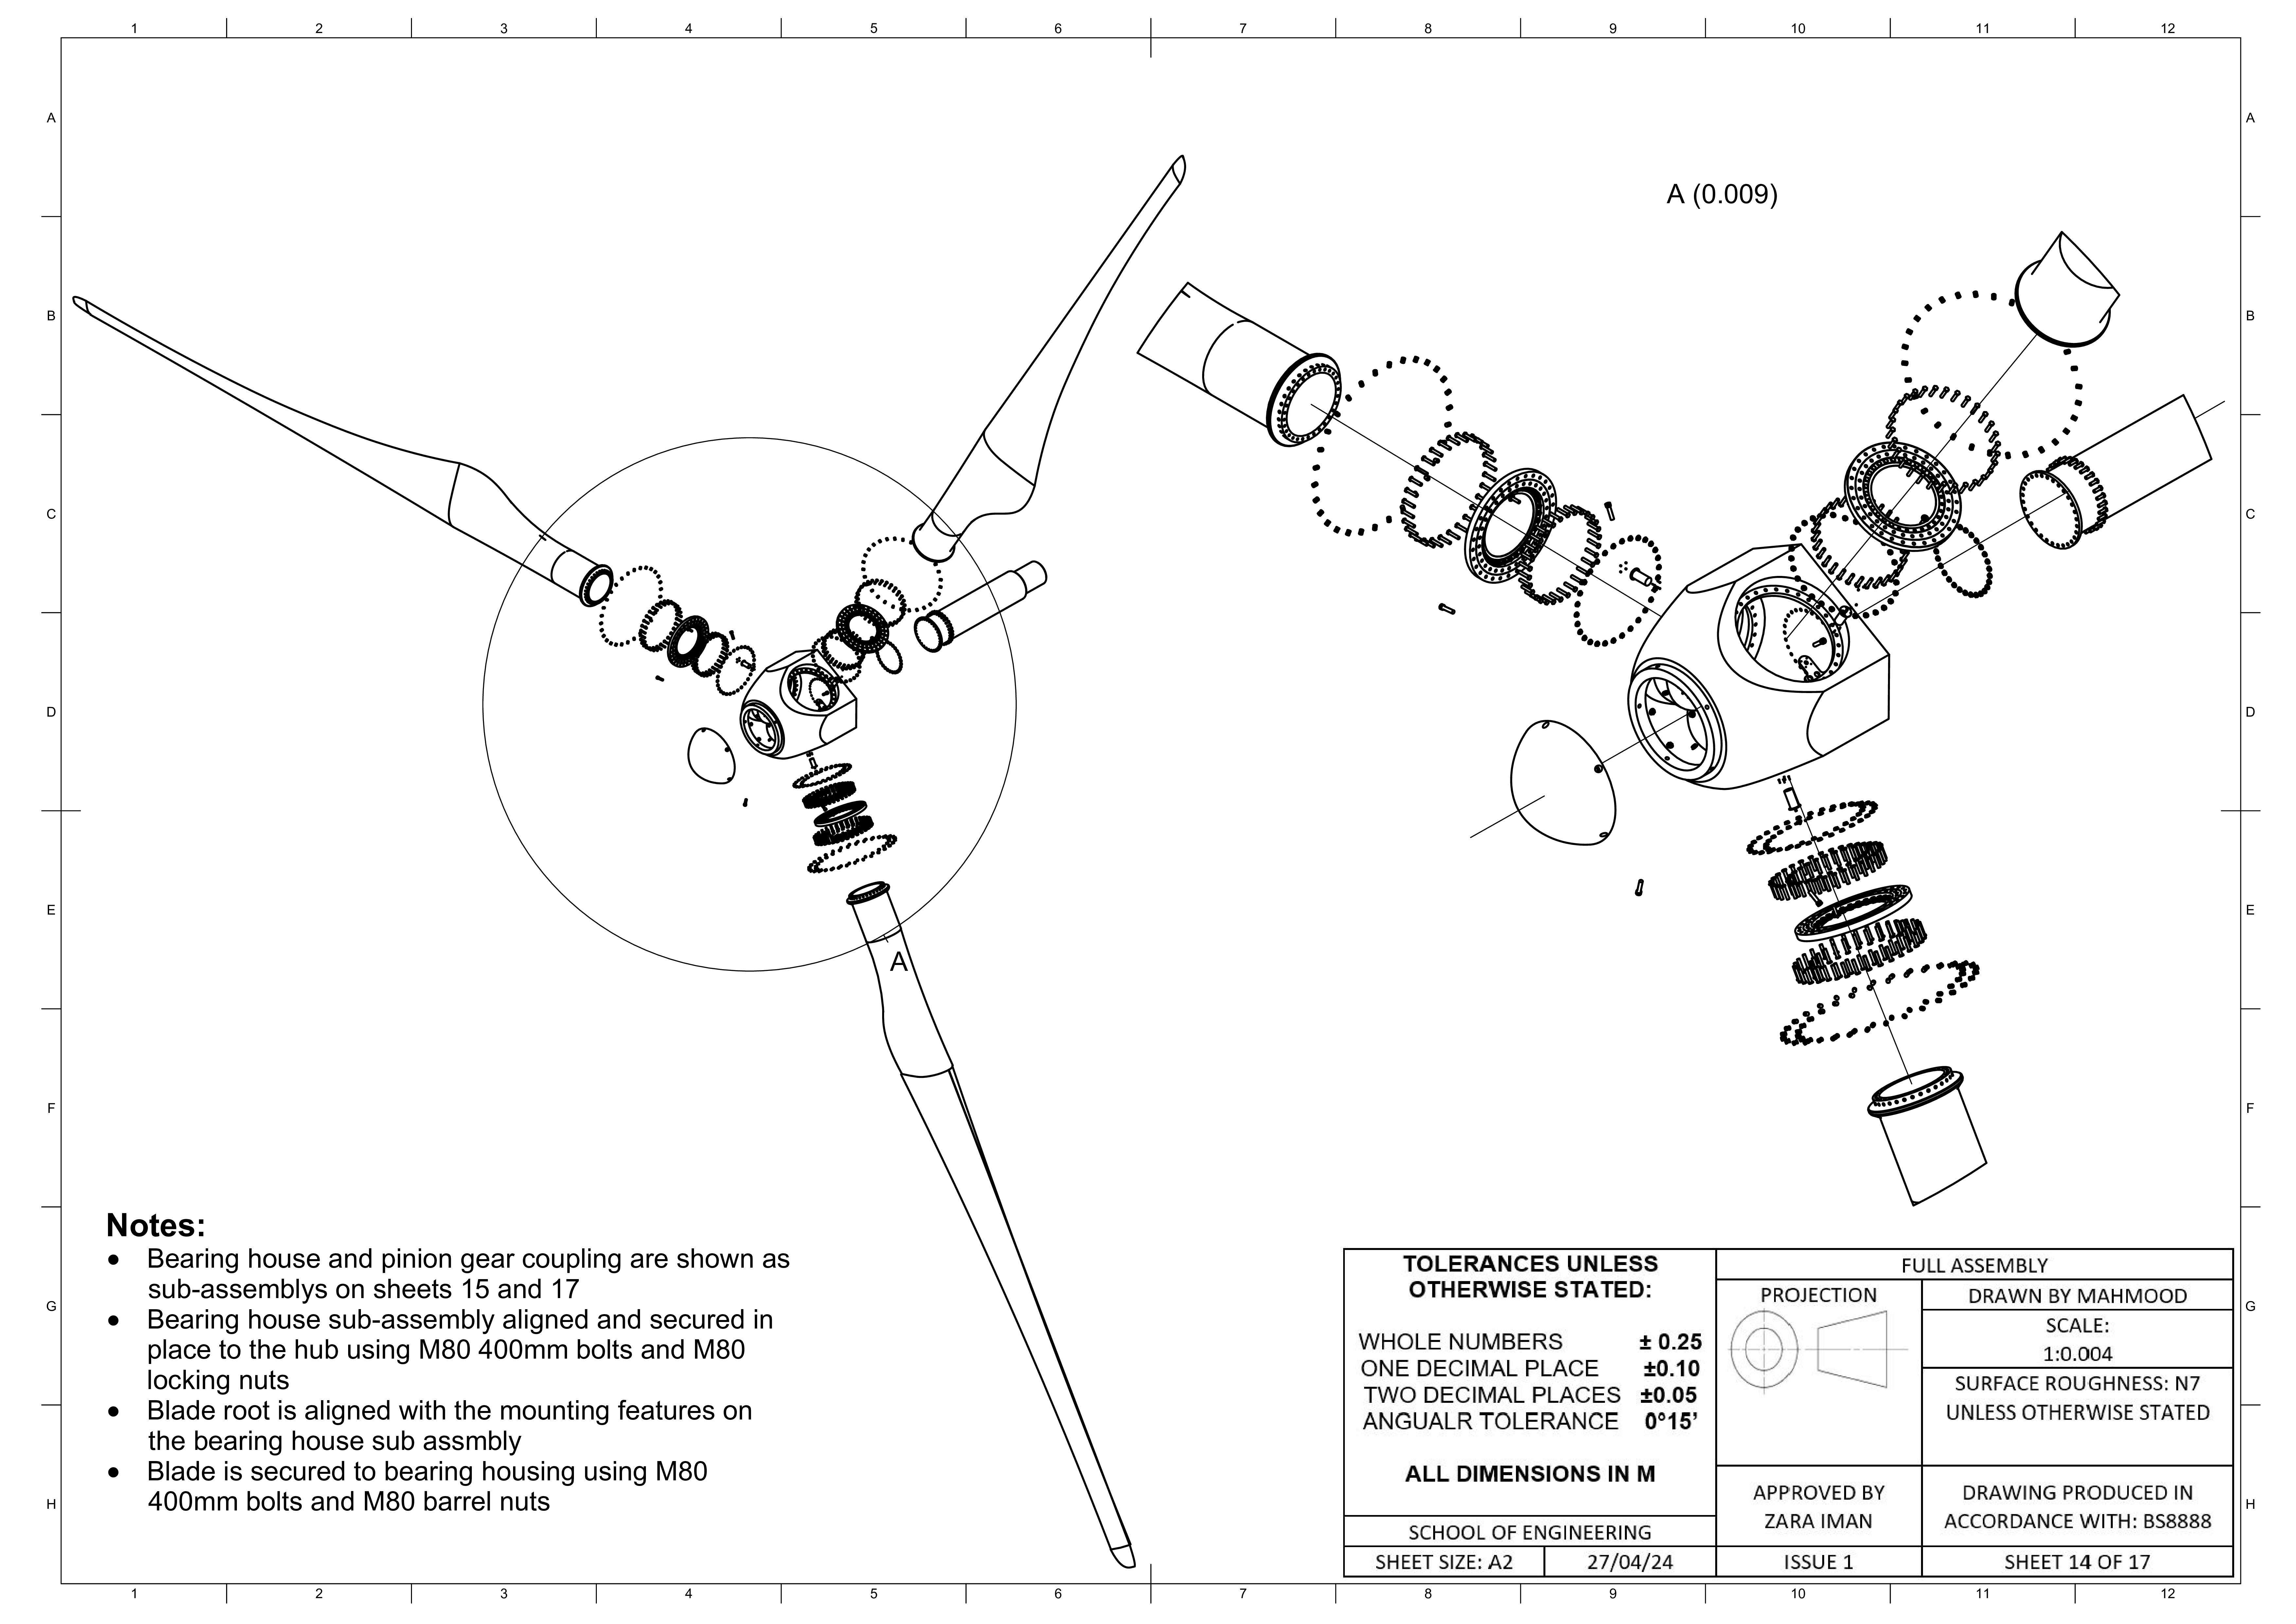
With the business case in place, we then moved into the practical side of things—developing the operations list, bills of materials and routing sheets. These were essential to ensuring that the design could be efficiently manufactured, assembled and maintained, all while keeping costs under control and making sure every part fits seamlessly into the production process.

Once the design and business case were solidified, we shifted focus to the nuts and bolts of making it all happen. This involved creating detailed operations lists, bills of materials and routing sheets to streamline the manufacturing and assembly process. Every component was carefully accounted for, ensuring that the right materials and parts would be available at the right time, keeping production efficient and on track. The routing sheets mapped out the entire assembly process, ensuring smooth workflows and minimal downtime, while the operations list outlined each step needed to turn our design into a fully functional turbine system.
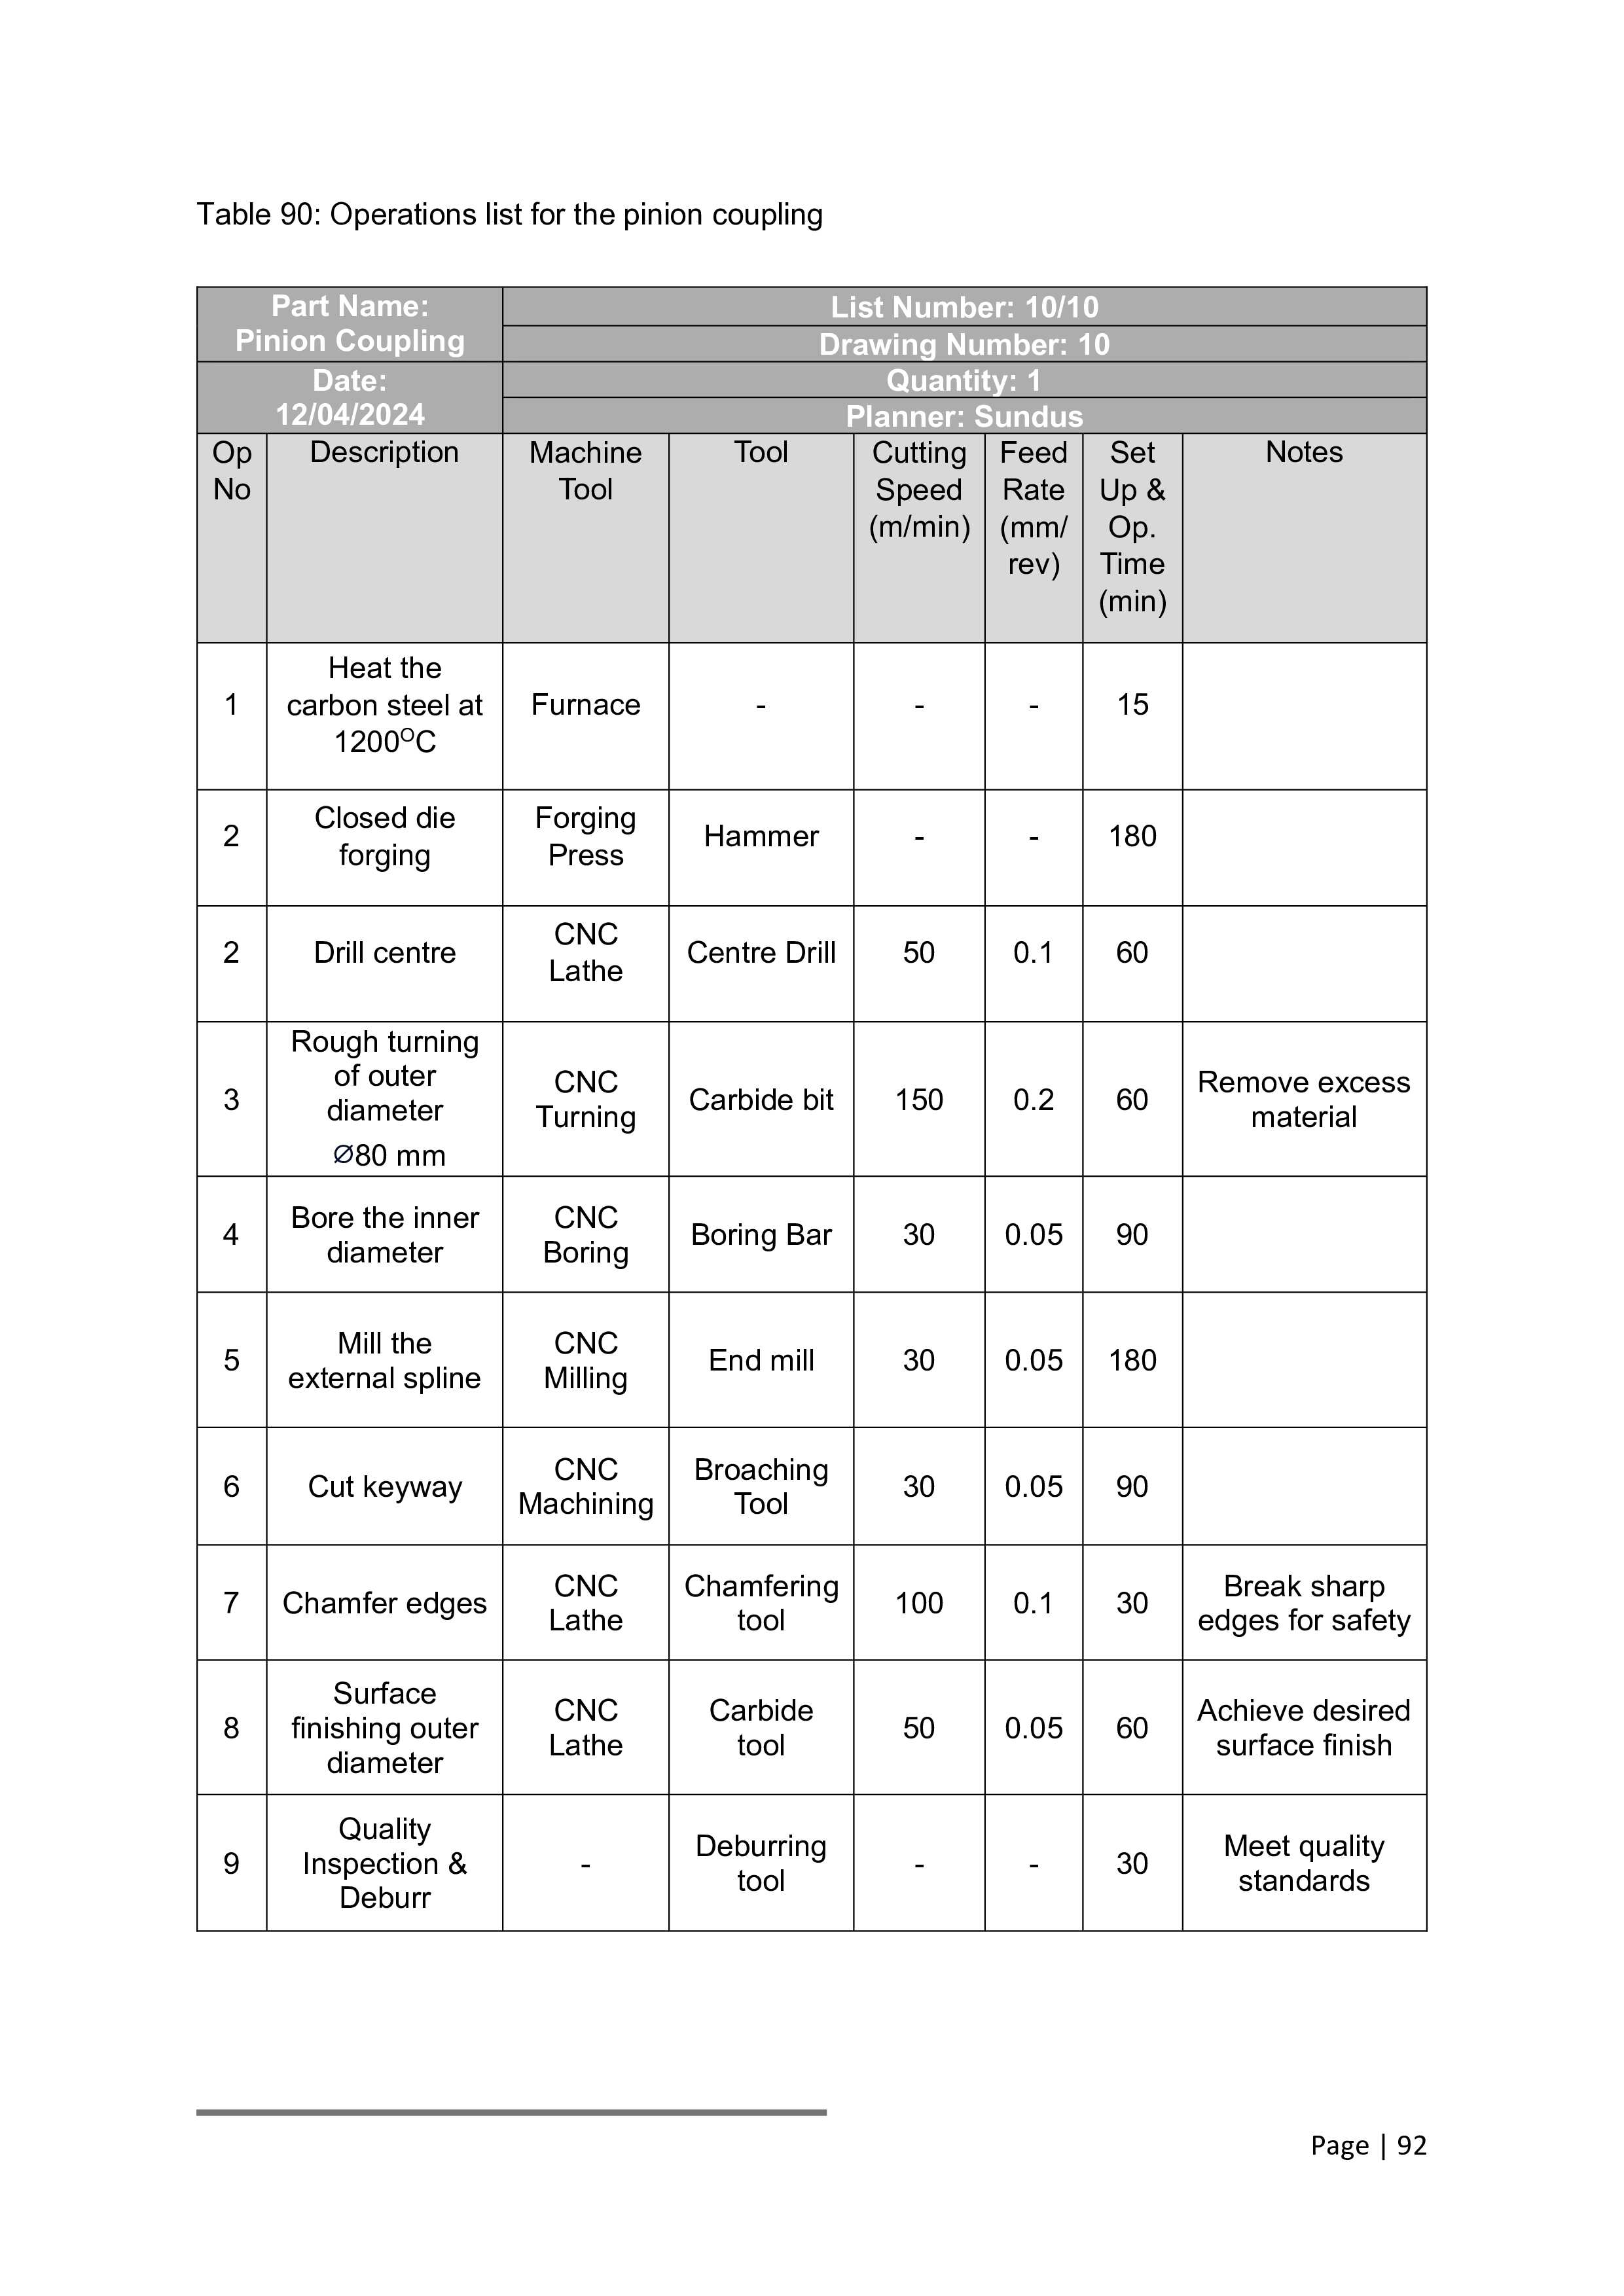
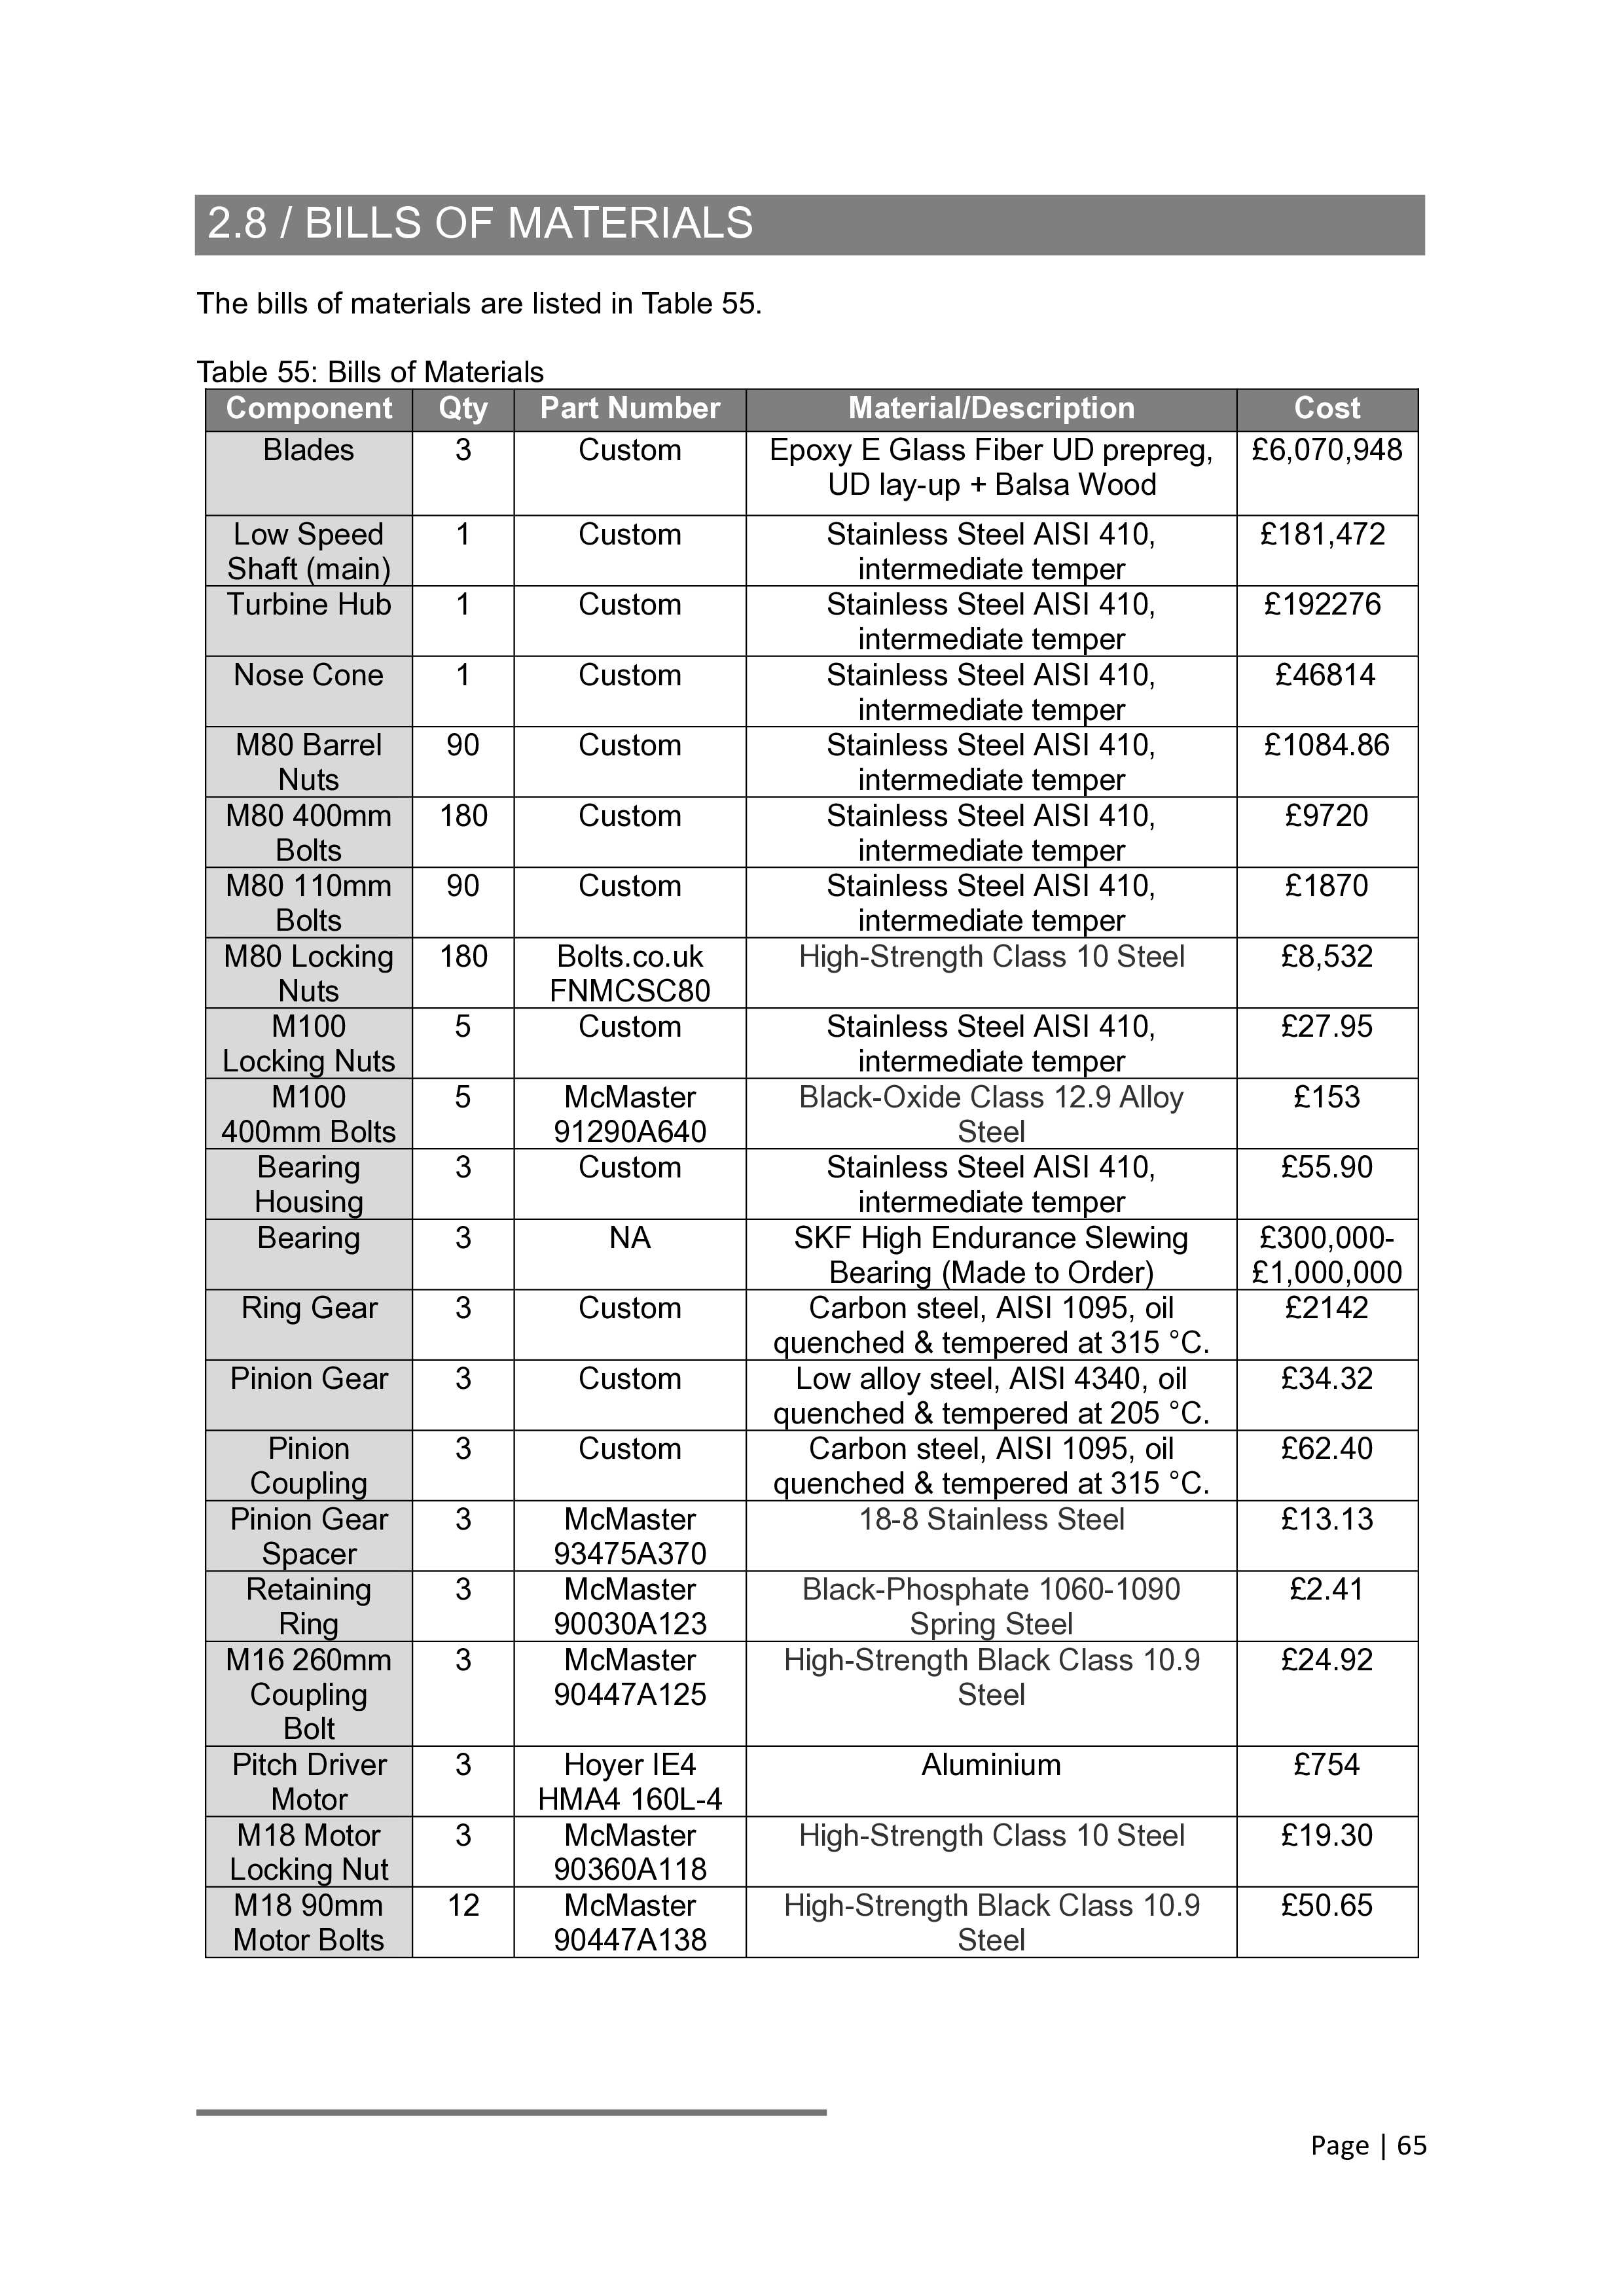
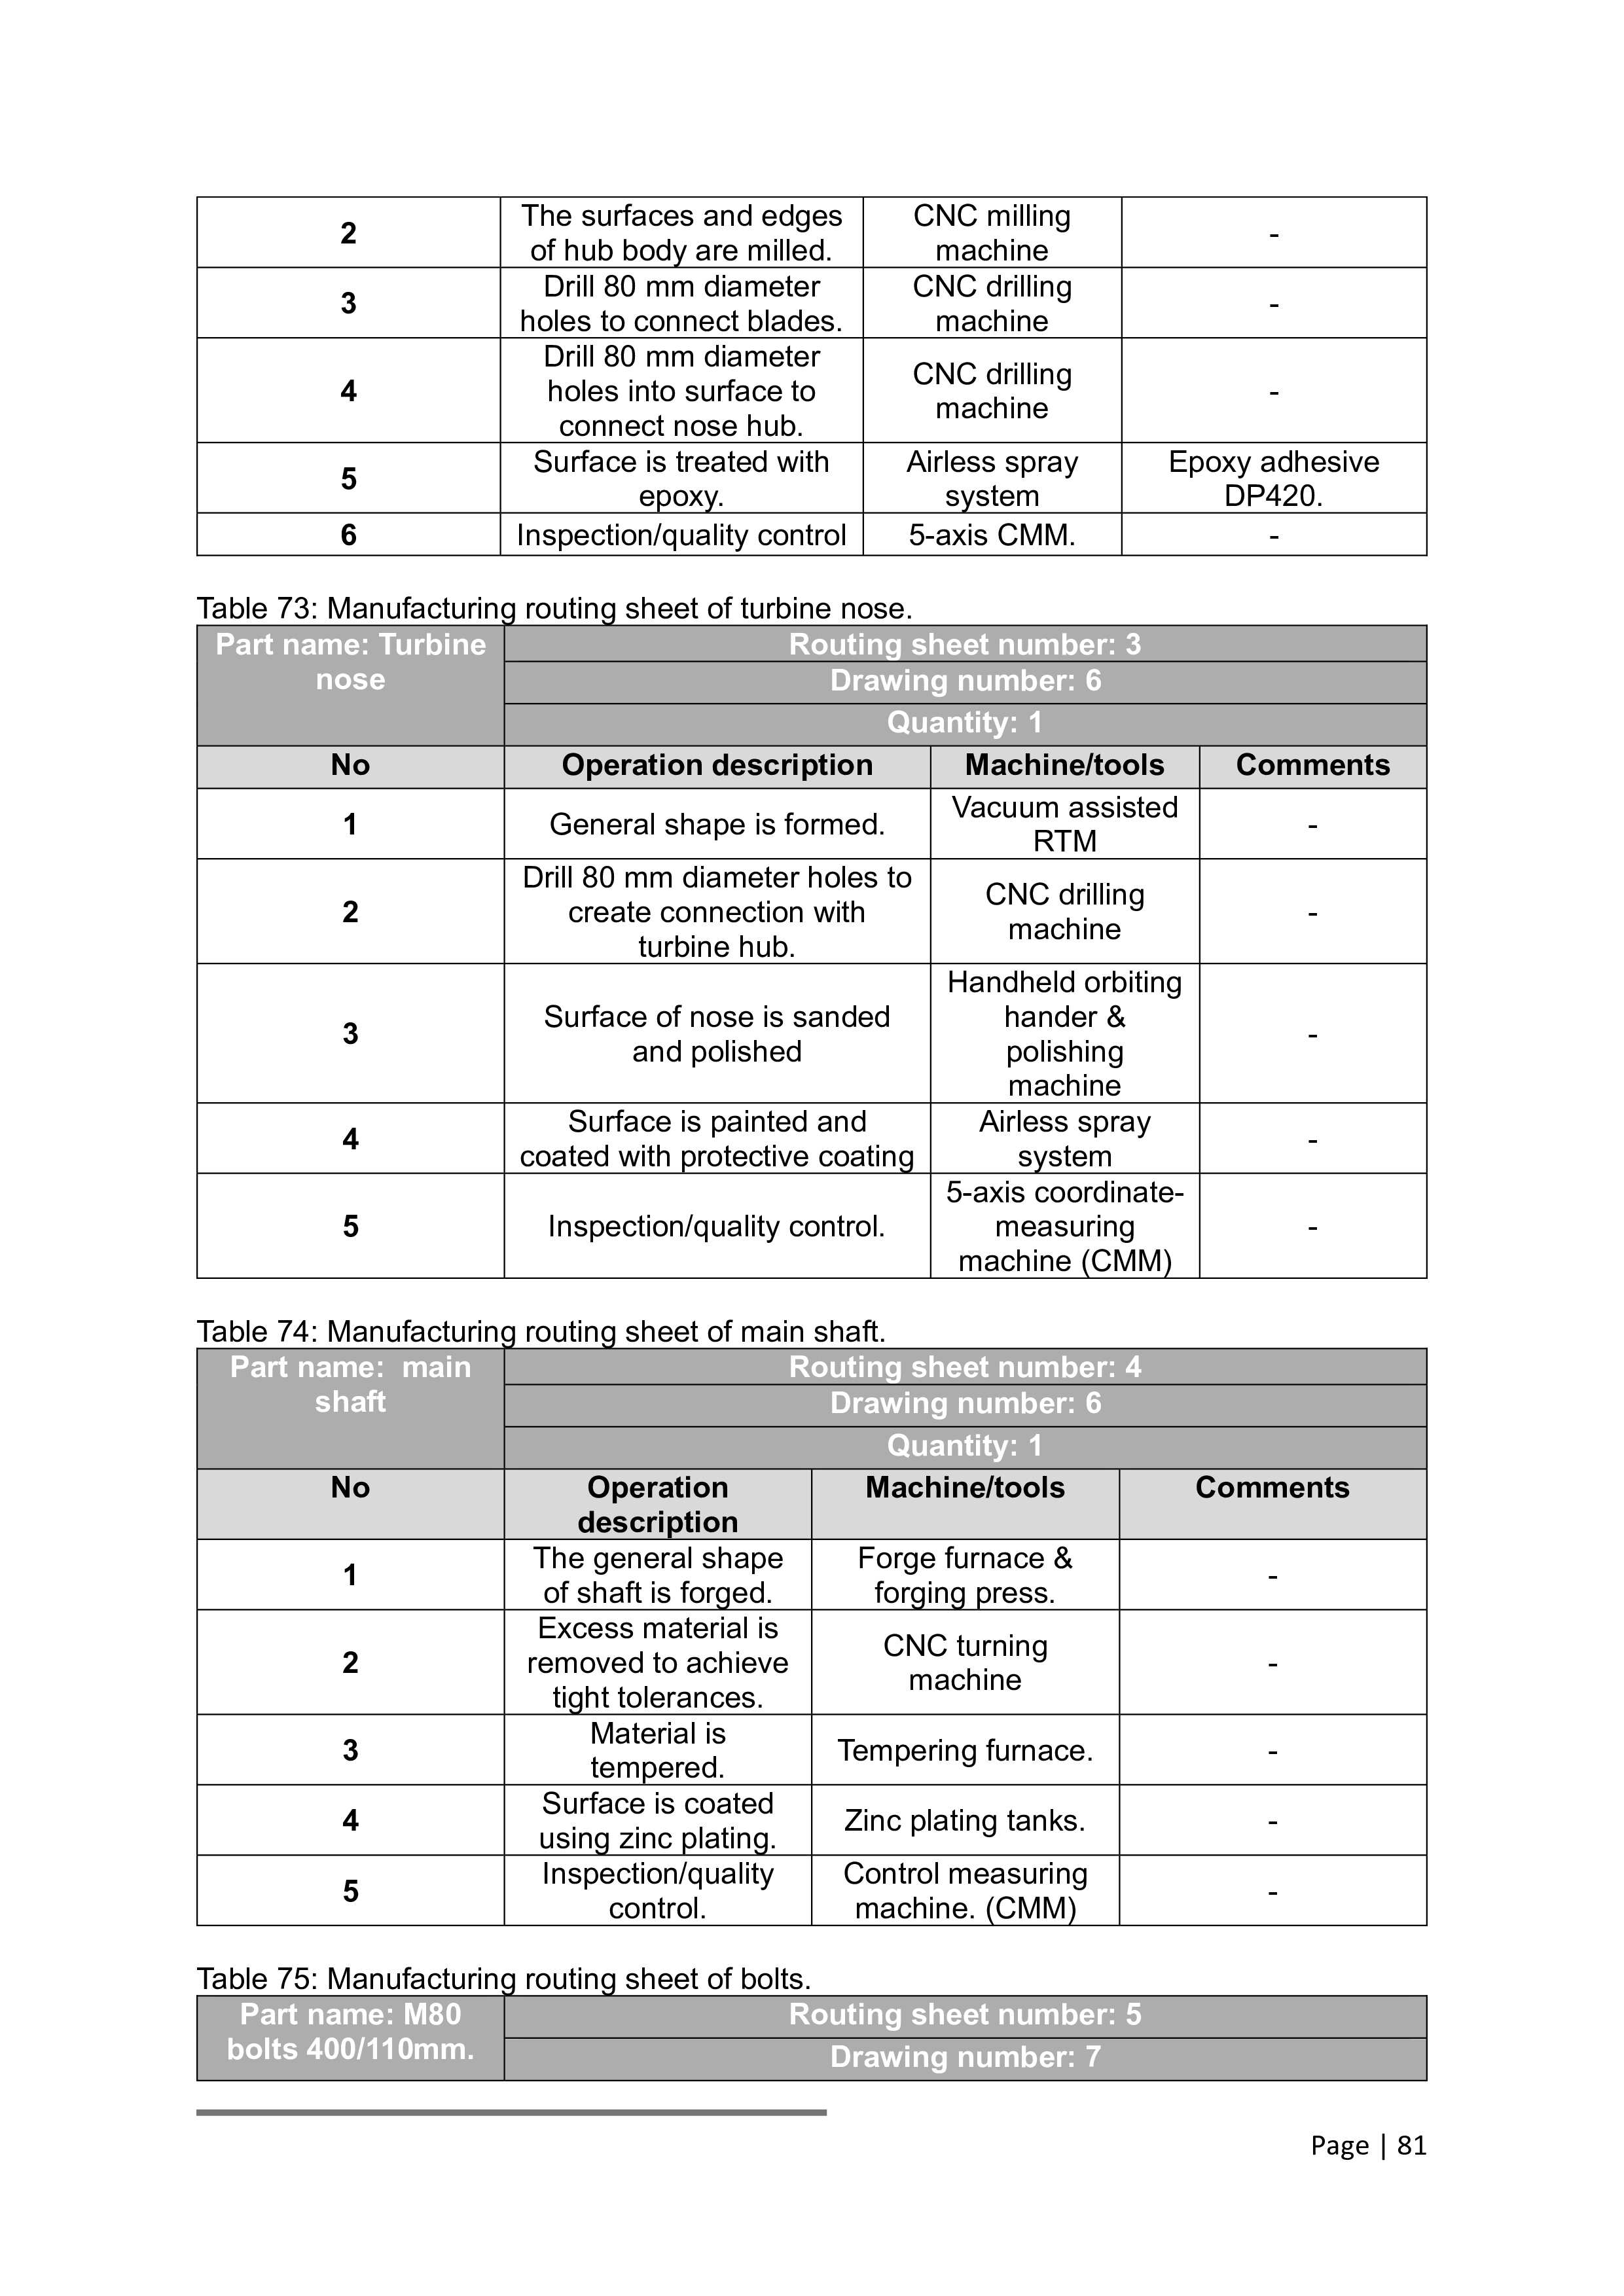
Once the design and business case were solidified, we shifted focus to the nuts and bolts of making it all happen. This involved creating detailed operations lists, bills of materials and routing sheets to streamline the manufacturing and assembly process. Every component was carefully accounted for, ensuring that the right materials and parts would be available at the right time, keeping production efficient and on track. The routing sheets mapped out the entire assembly process, ensuring smooth workflows and minimal downtime, while the operations list outlined each step needed to turn our design into a fully functional turbine system.
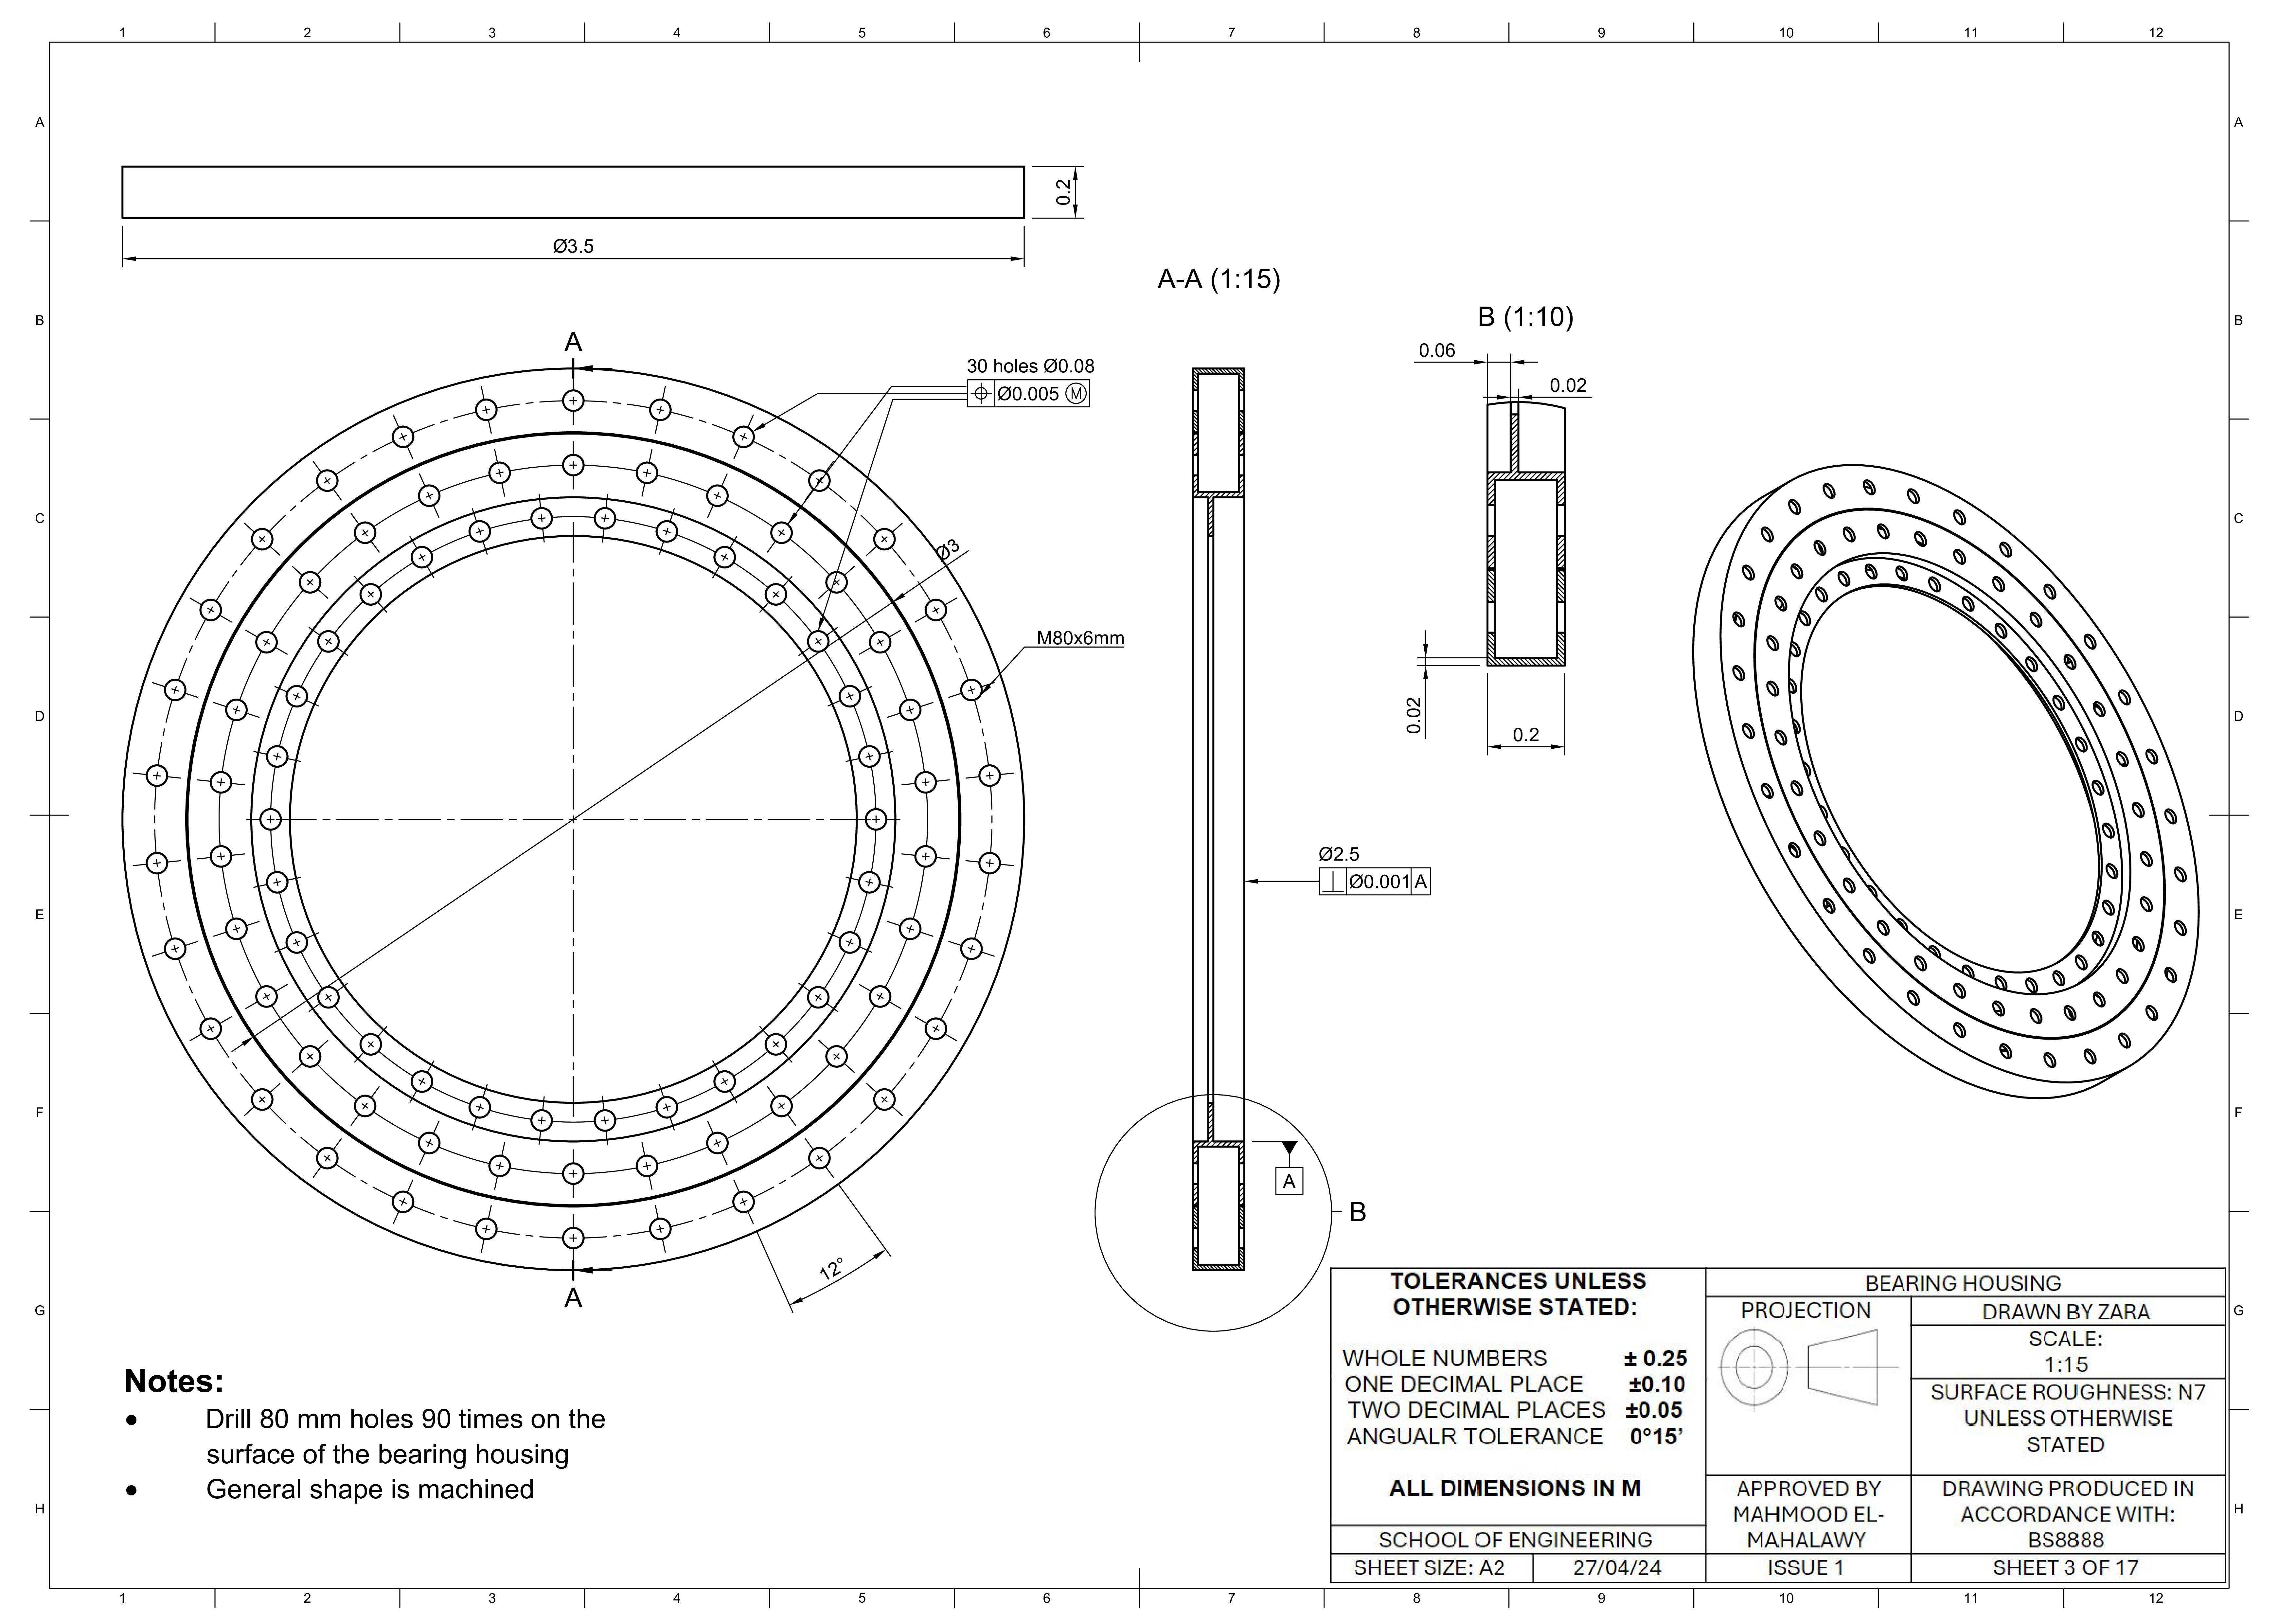
With the report wrapped up and the numbers crunched, it’s time to bring those ideas to life—say hello to the prototype, where theory meets reality (and a bit of trial and error)!
Here it is—the big reveal!
Our 3D-printed turbine, fresh off the printer and ready to spin. After hours of designing, troubleshooting, and a few 'wait, why isn’t it spinning?’ moments, we finally brought our wind turbine to life.
Watch as all those theoretical numbers and designs come together in a mini turbine that actually works—because nothing beats seeing your hard work spin into action!
And now here's a peek behind the scenes at the making of our turbine
And there you have it—the journey from brainstorms to blueprints, presentations to prototypes. We’ve powered through every challenge, and now, the future of renewable energy is one step closer!